

Appearance
FluentCRM
FluentCRM is a WordPress-native CRM and email marketing plugin. When FluentPlayer and FluentCRM are both active on the same site, they connect to each other automatically — there is no API key to paste and no account to link.
Once they are talking to each other, FluentPlayer can tell FluentCRM what your viewers actually did with your videos: how much they watched, and whether they acted on any interactive layer like a CTA, an ad, or a form. FluentCRM can then record that on the contact's profile and use it to start an email automation.
Free integration
The FluentCRM integration is free. It turns on by itself as soon as both plugins are installed.
What You Can Do with FluentCRM and FluentPlayer
- Log watch activity on a contact's profile — see that a specific person started, reached 25/50/75%, or finished a specific video, with the time they watched.
- Log layer interactions — record when a viewer sees, completes, or skips any interactive layer: a CTA, an ad, a form, or an email capture overlay.
- Run full automations from watch behavior — video milestones and layer interactions work as both triggers and goals in FluentCRM automations, so you can send a follow-up email when someone finishes a video, apply a tag when they act on a CTA, or move them to another list when they drop off halfway.
- Capture emails into FluentCRM — new subscribers from an email capture overlay land in the lists and tags you choose.
- Personalize what's on screen — show a viewer's own name inside overlays and titles with Smartcodes.
Before You Begin
Make sure the following are in place:
- FluentPlayer is installed and active.
- FluentCRM is installed and active on the same site.
- You have at least one media item in FluentPlayer → Media that you want to track.
Step 1: Open the FluentCRM Integration Settings
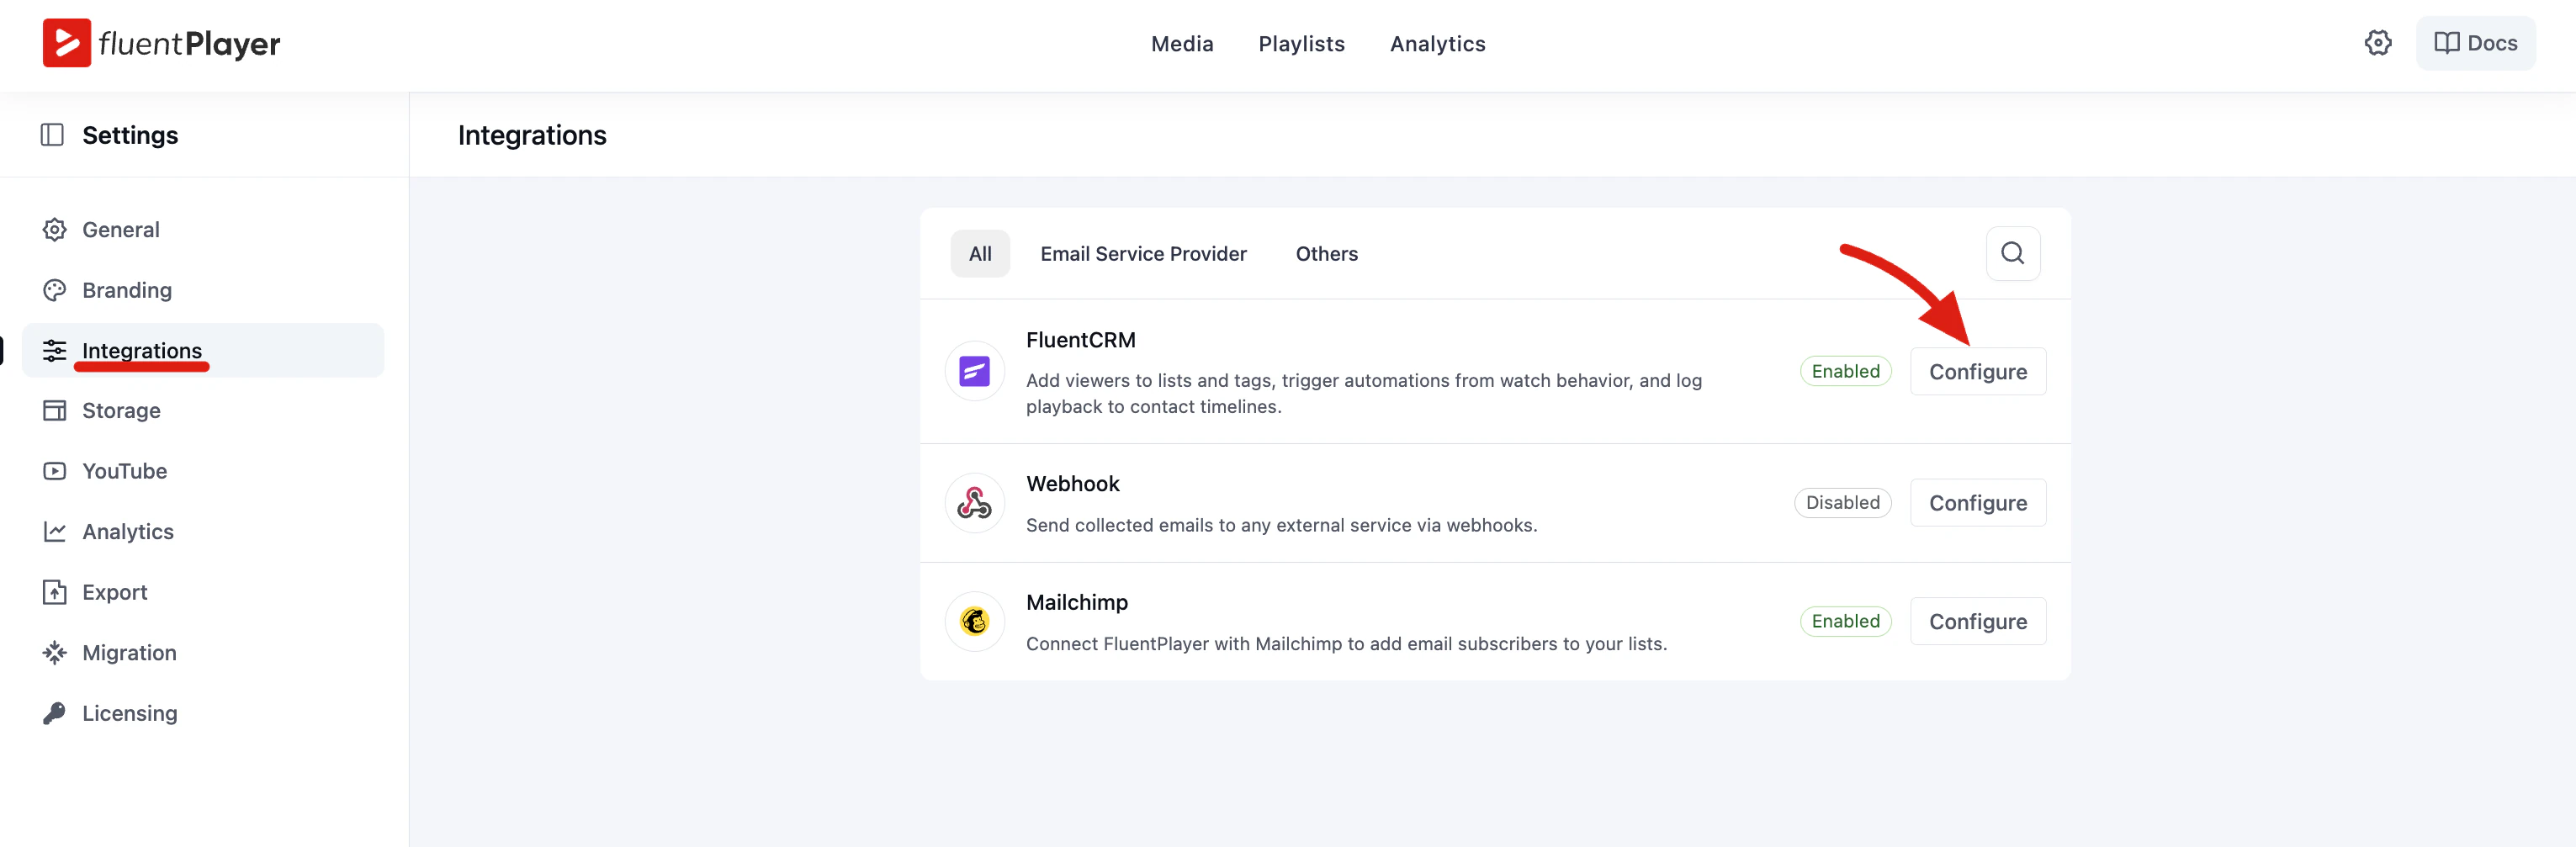
Go to FluentPlayer → Settings → Integrations.
FluentCRM appears in the list with an Enabled badge — this confirms FluentPlayer has found the plugin. Click Configure to open its settings.
TIP
If FluentCRM does not appear here at all, the plugin is not active. Activate it in WordPress → Plugins, then reload this page.
Step 2: Choose What Gets Logged to the Contact Timeline
The FluentCRM settings screen has two parts: Automation Triggers at the top, and Contact Timeline below it.
Automation Triggers
This card is a read-only summary — there is nothing to configure here. It lists any FluentCRM automation that already uses a FluentPlayer trigger, so you can see at a glance what your videos are driving. Until you build one it simply reads "No automations use Fluent Player triggers yet"; you will create your first one in Step 5.
Contact Timeline
This is where you decide what FluentPlayer writes onto each contact's profile.
Turn on Log playback to contact timeline to start recording. Each event is recorded once per contact, per media item, so a viewer who rewatches the same video will not fill their timeline with duplicates.
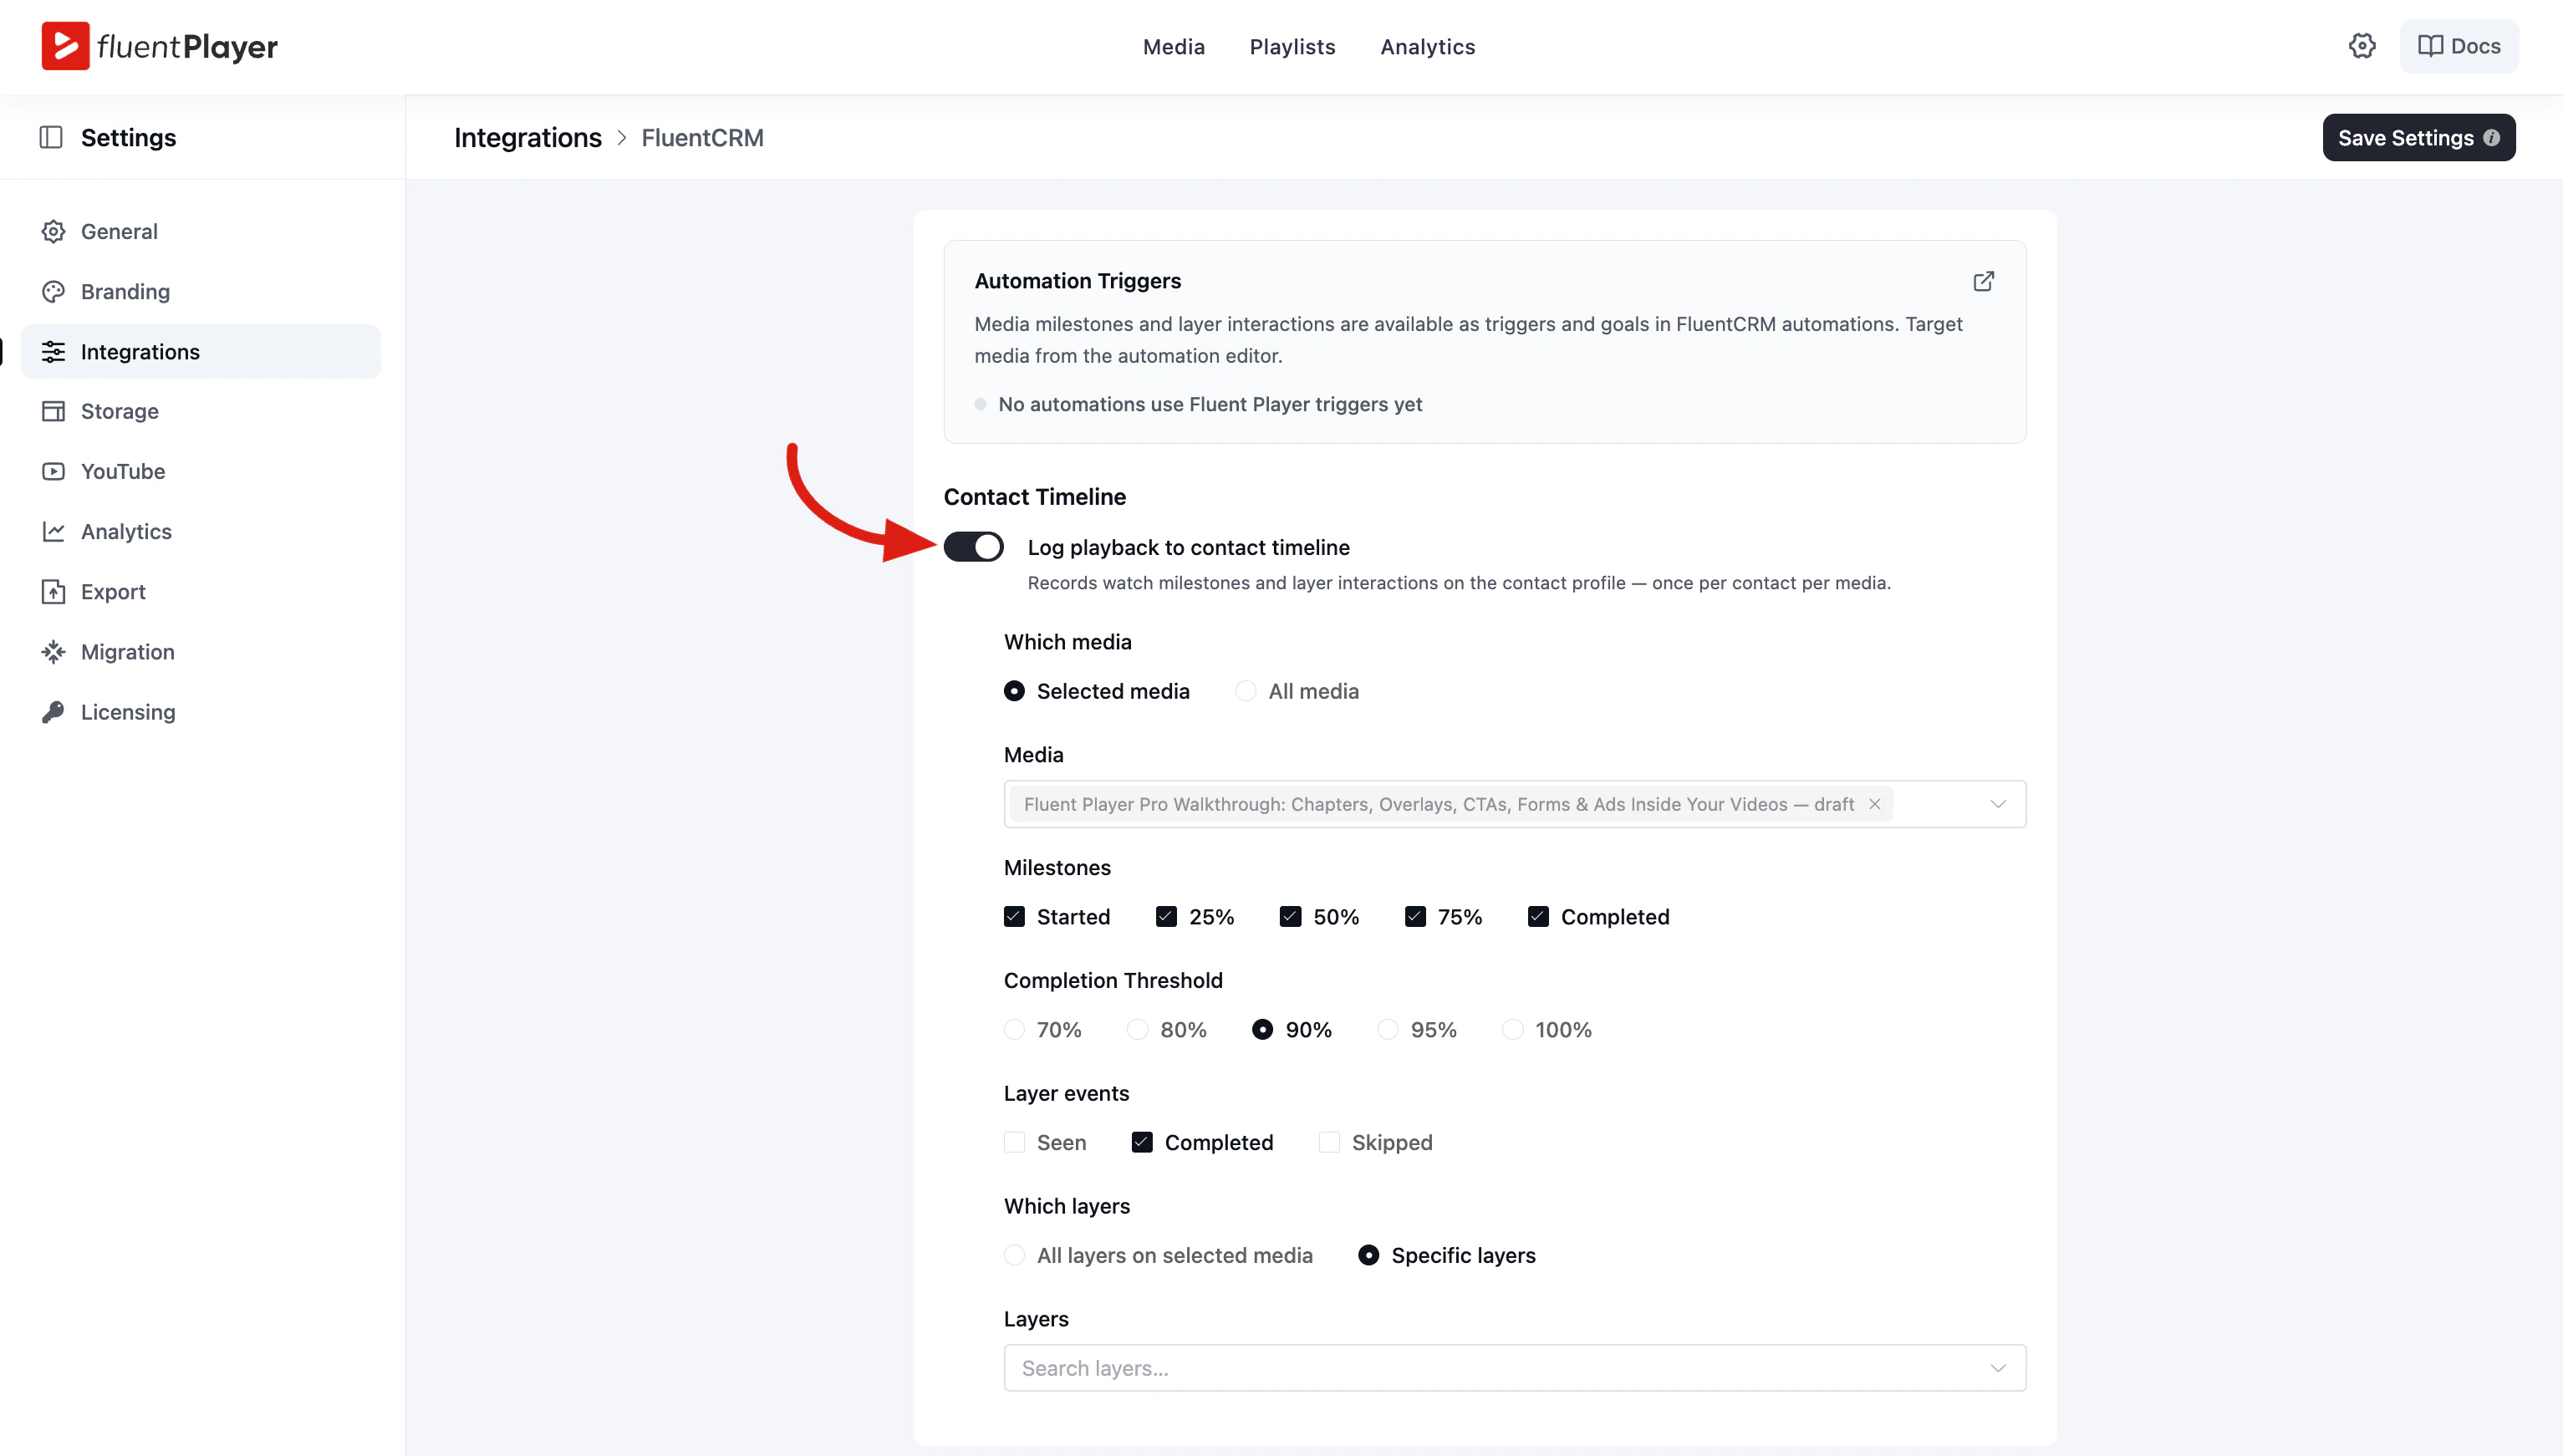
Once the toggle is on, these options appear:
| Setting | Options | What it does |
|---|---|---|
| Which media | Selected media / All media | Log every video on your site, or only the ones you pick. |
| Media | Search field | Appears when Selected media is chosen. Search and add the specific media items to track. |
| Milestones | Started, 25%, 50%, 75%, Completed | The watch points you want recorded. Tick only the ones you care about to keep timelines readable. |
| Completion Threshold | 70% / 80% / 90% / 95% / 100% | How much of the video counts as "Completed". |
| Layer events | Seen, Completed, Skipped | Which interactions with interactive layers get logged. |
| Which layers | All layers on selected media / Specific layers | Log every layer, or narrow it down to individual ones. |
| Layers | Search field | Appears when Specific layers is chosen. Pick the exact layers to track. |
Click Save Settings in the top-right corner when you are done.
Step 3: Turn On Event Tracking in FluentCRM
FluentPlayer is now sending activity, but FluentCRM needs one setting enabled on its own side before it will display it. Without this step the contact timeline stays empty.
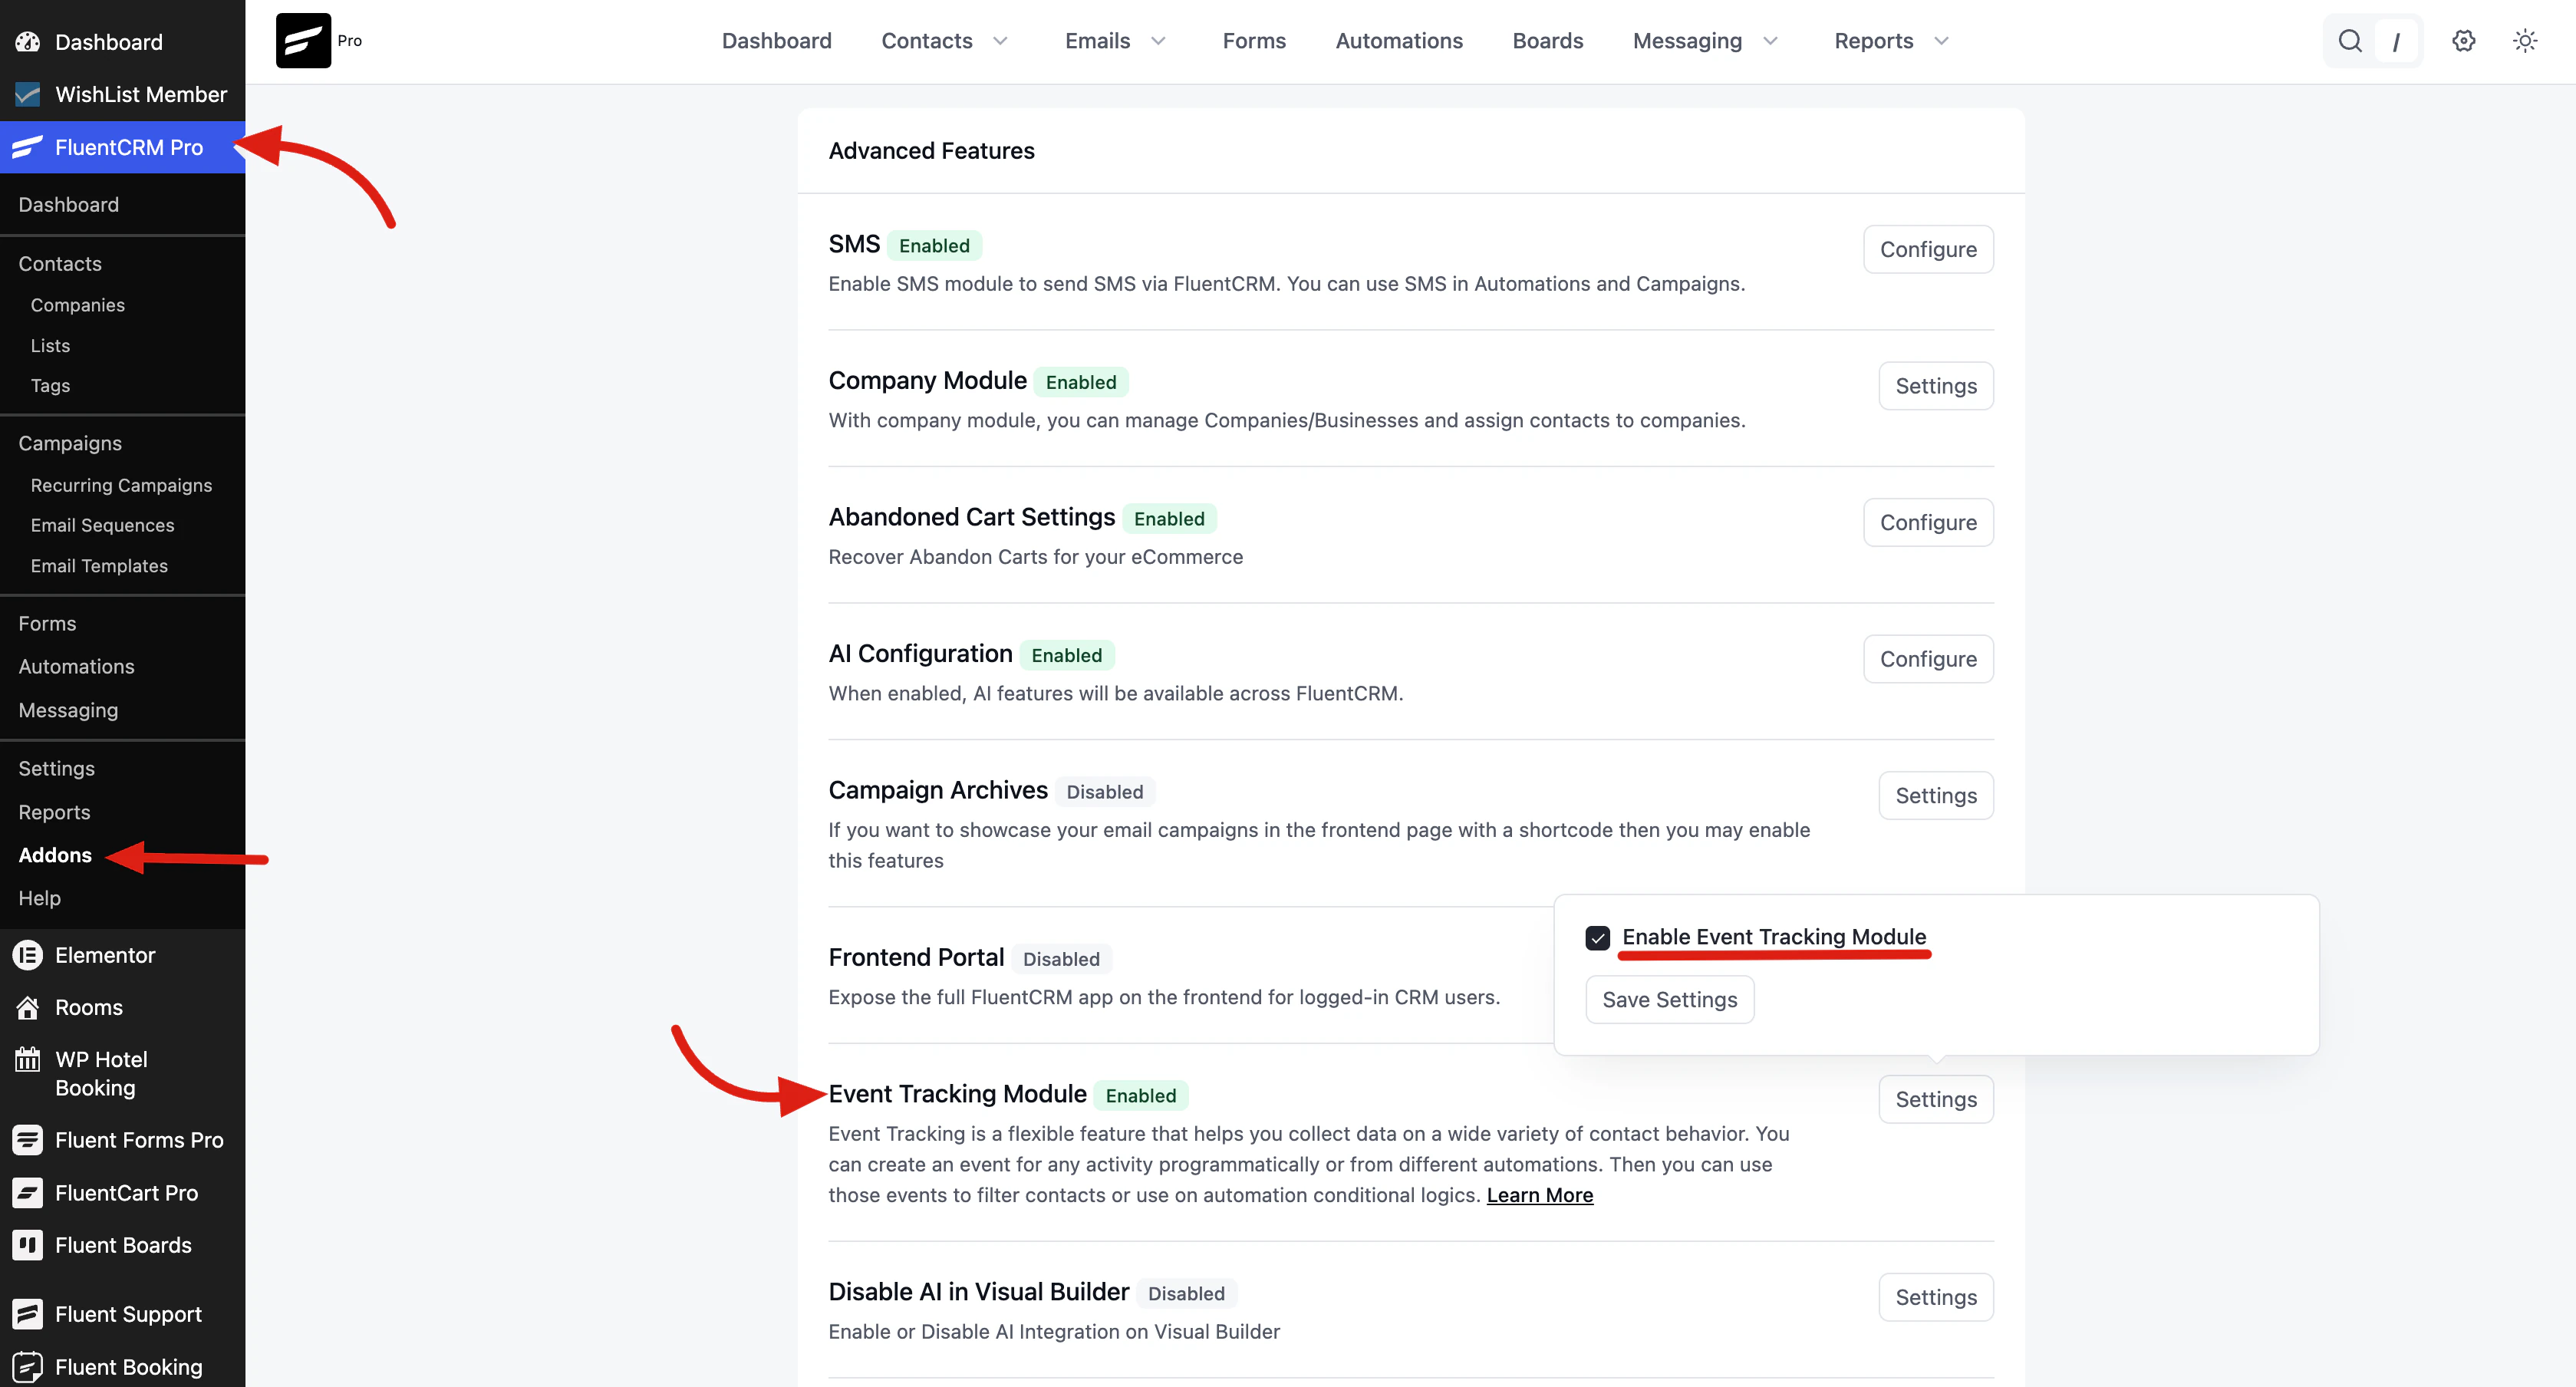
- In the WordPress sidebar, go to FluentCRM → Addons.
- Scroll to Event Tracking Module under Advanced Features.
- Click Settings, tick Enable Event Tracking Module, and click Save Settings.
The badge next to the module changes to Enabled.
WARNING
This is the step people miss. If nothing is showing up on your contacts, come back to FluentCRM → Addons and check that the Event Tracking Module is enabled.
Step 4: See the Activity on a Contact
Open FluentCRM → Contacts and click any contact who has watched one of your tracked videos. In the Additional Information panel on the right, you will find an Event Tracking section listing what they did, newest first.
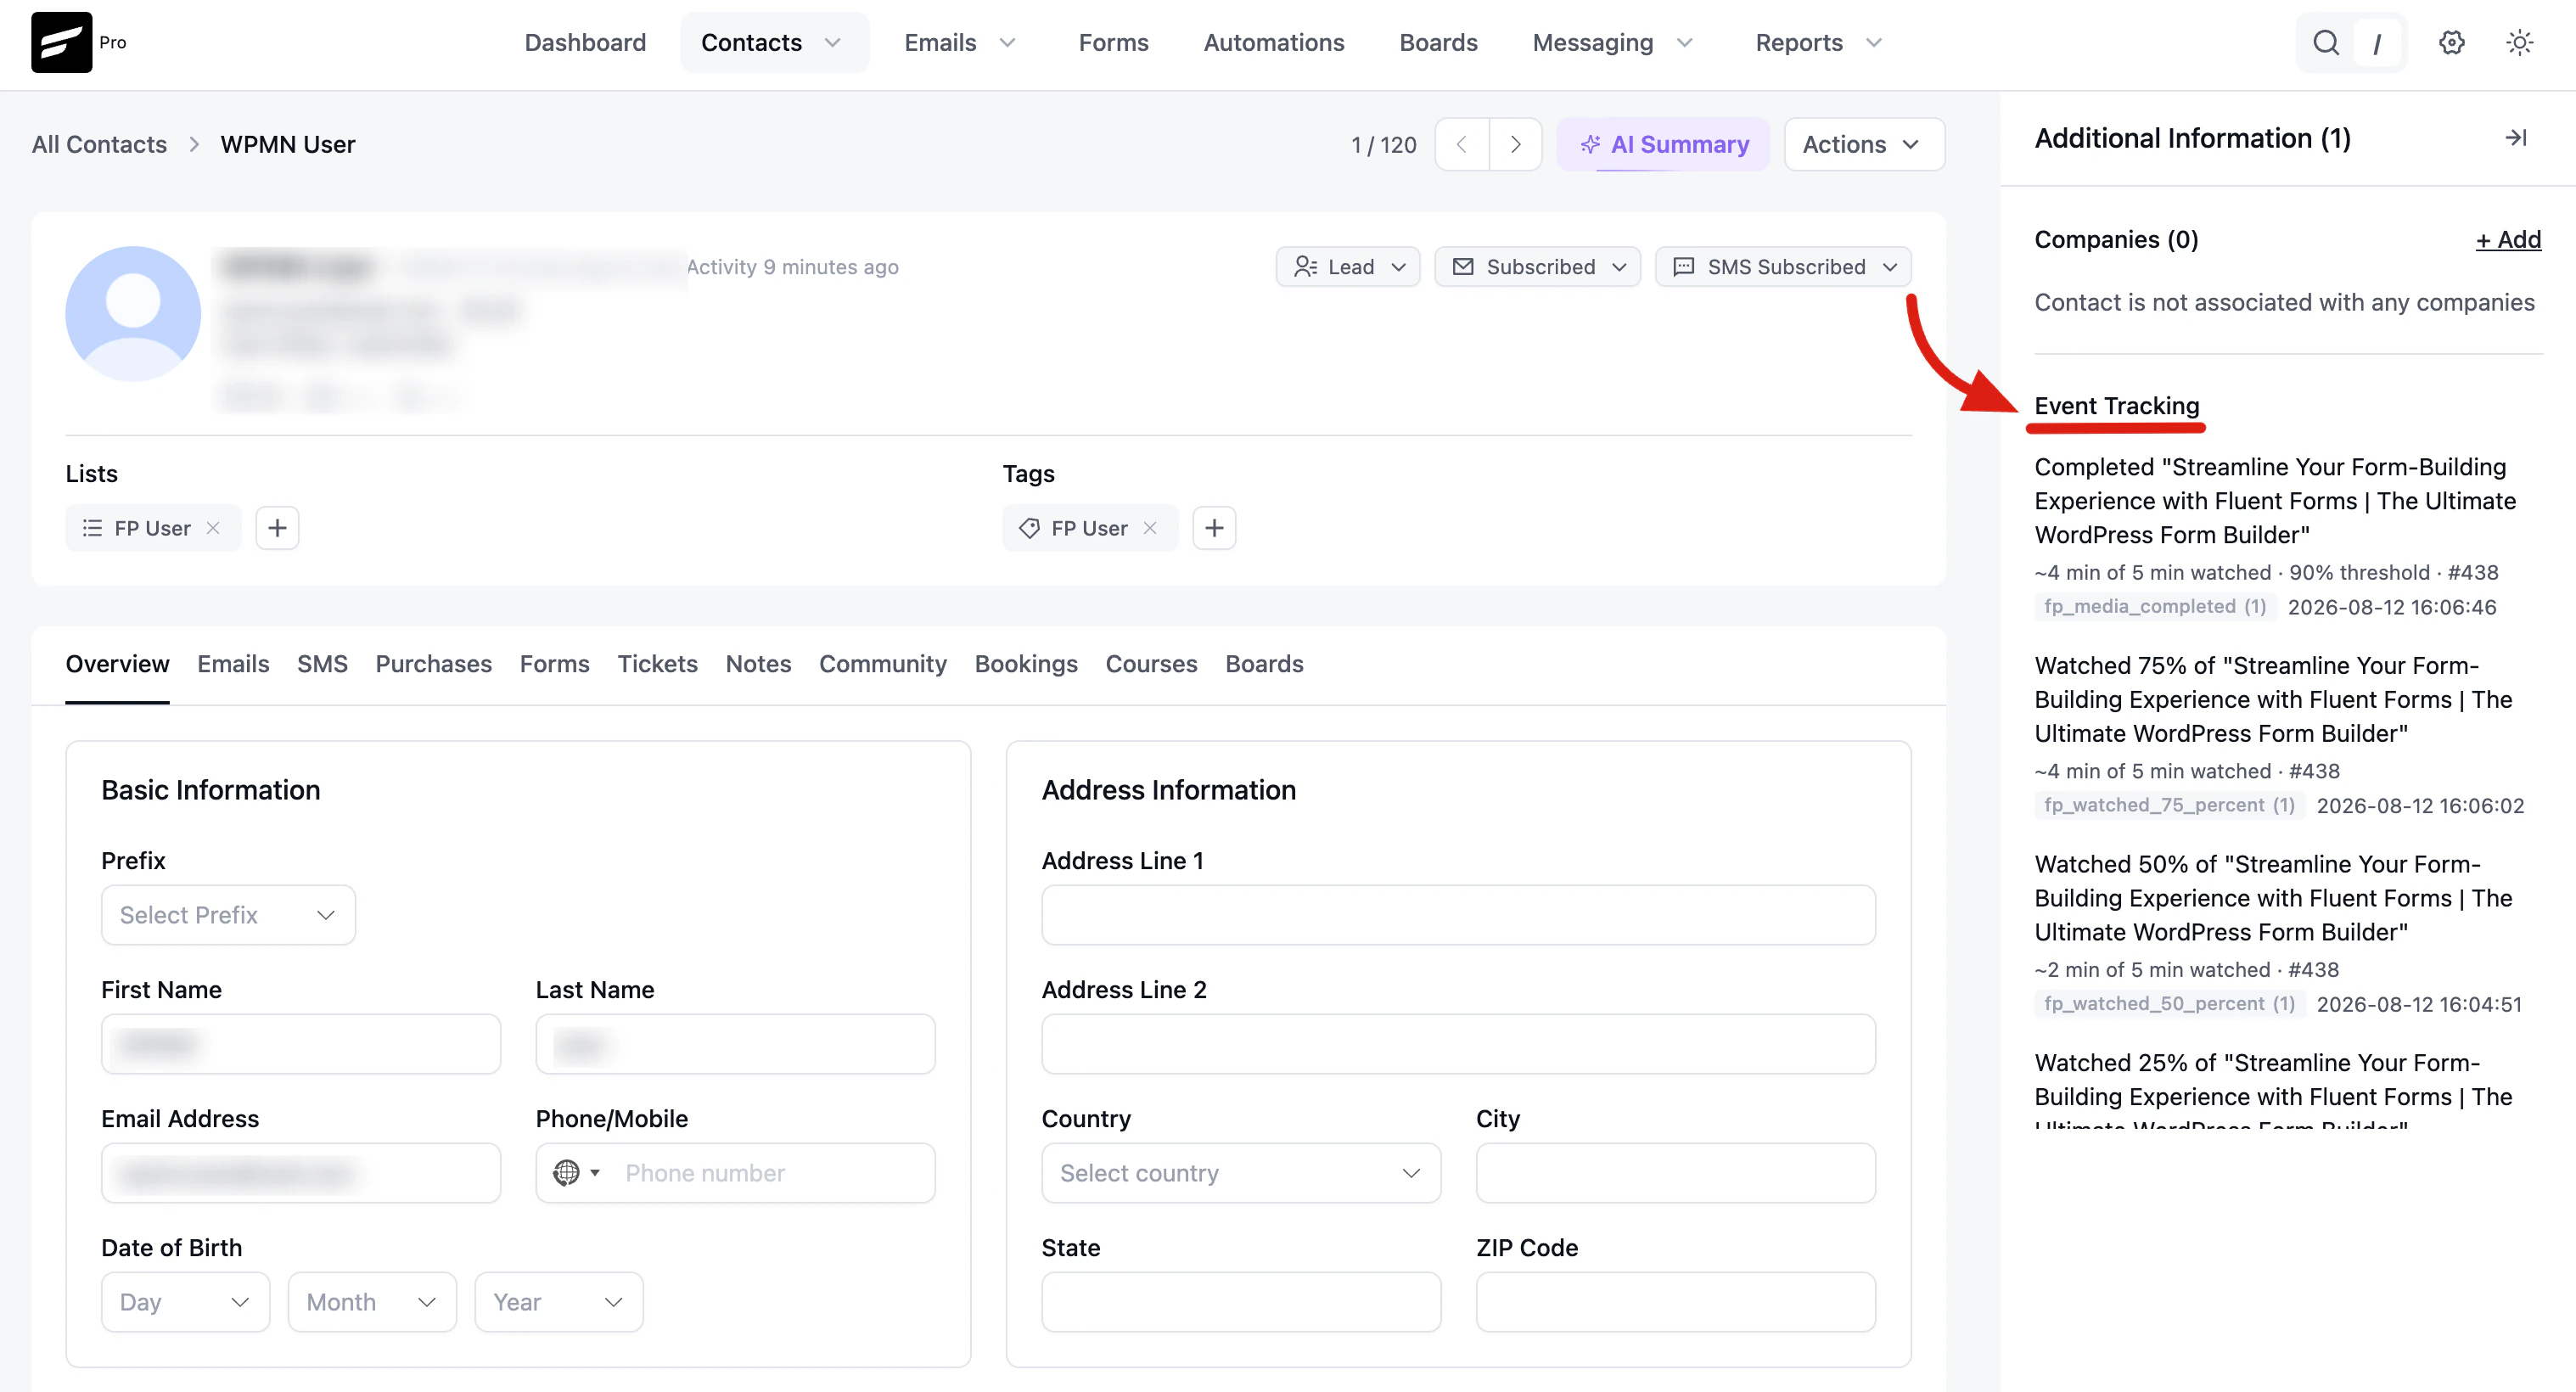
Each entry gives you the full picture at a glance:
- What happened and to which video — for example, Watched 75% of "Streamline Your Form-Building Experience with Fluent Forms".
- How much they actually watched — for example, ~4 min of 5 min watched · 90% threshold · #438, where
#438is the media ID. - The event key and timestamp — for example,
fp_media_completedrecorded at2026-08-12 16:06:46.
Step 5: Build an Automation from Watch Behavior
The timeline tells you what happened. Automations let you do something about it — send an email, apply a tag, move someone to another list.
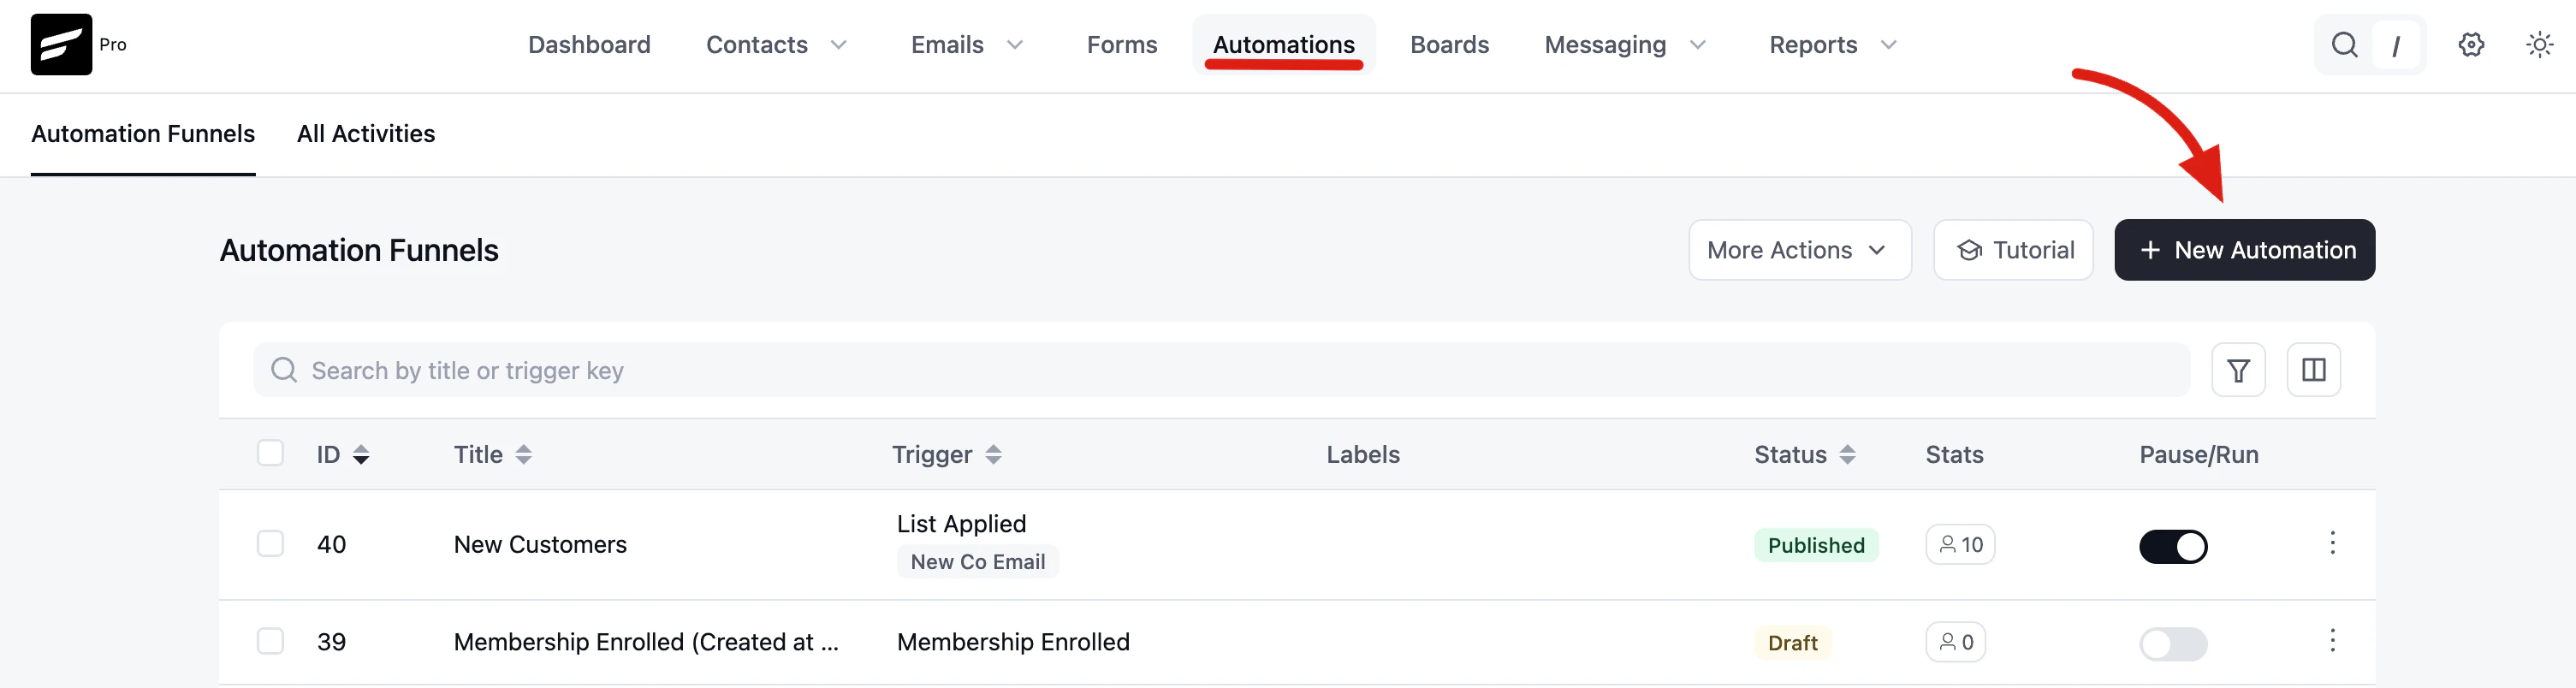
Go to FluentCRM → Automations and click + New Automation.
In the Create an Automation Funnel window, choose Fluent Player from the list on the left. Two triggers are available:
- Media Milestone Reached — starts when a viewer watches a video to a milestone you choose.
- Media Layer Interaction — starts when a viewer sees, completes, or skips an interactive layer such as a CTA, ad, or form.
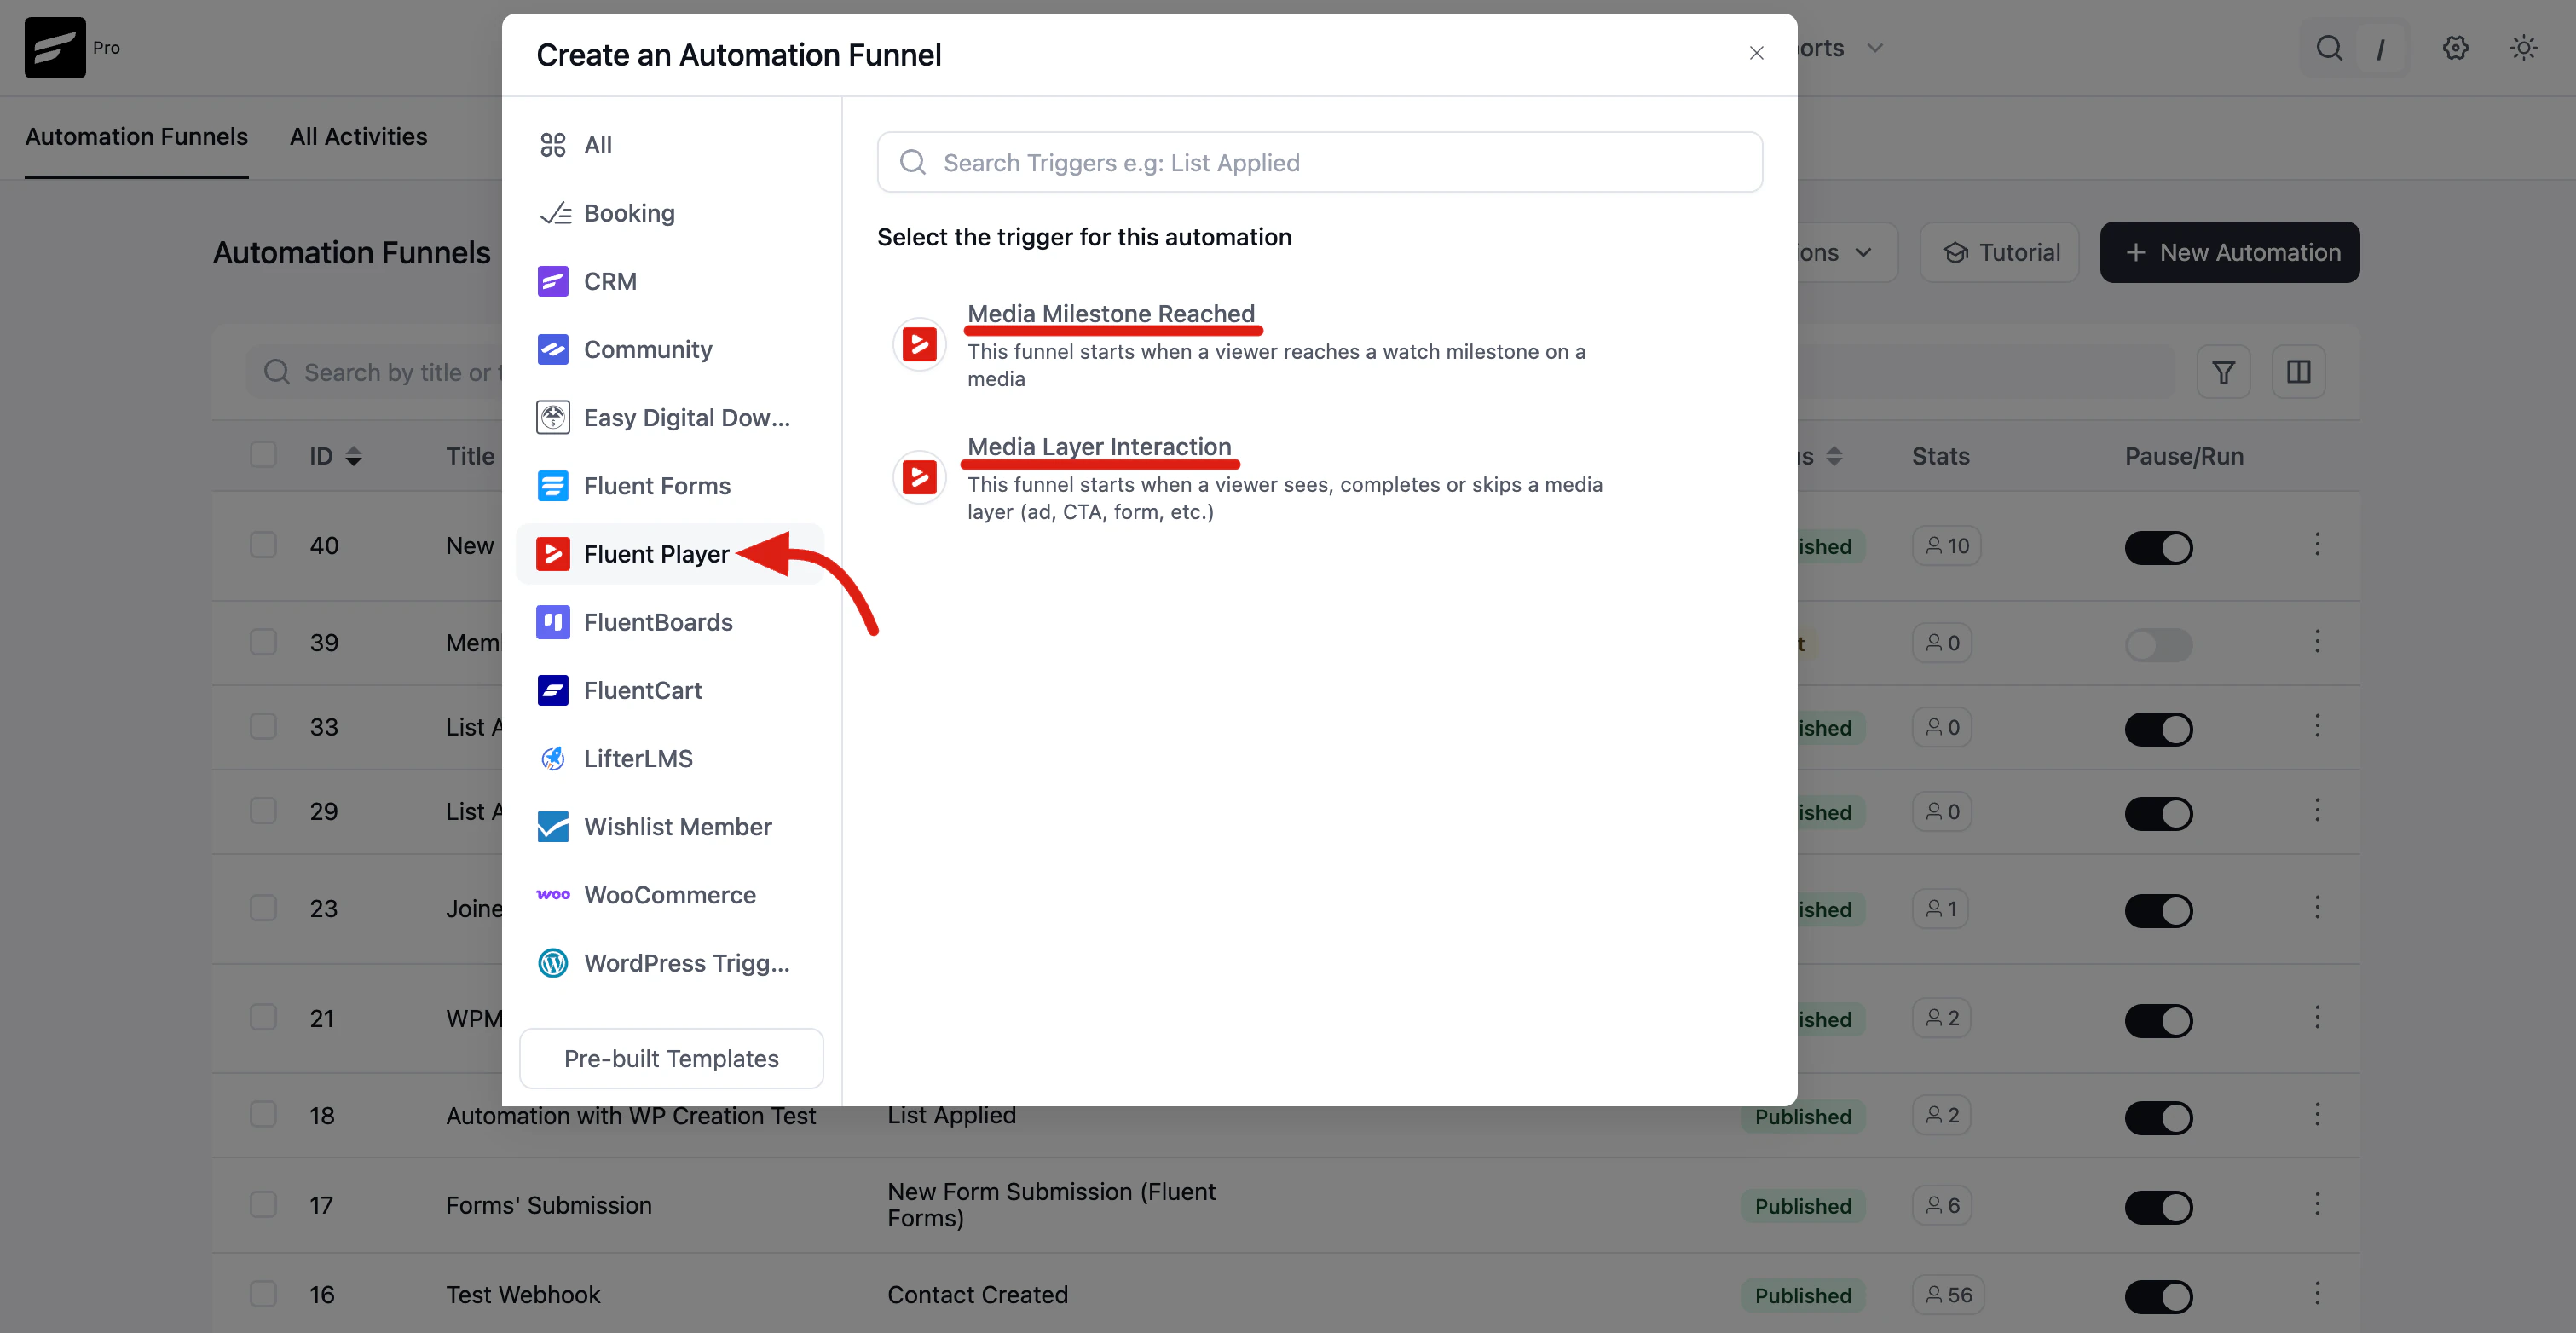
Click the trigger you want, and its settings open.
Trigger: Media Milestone Reached
Use this when the amount watched is what matters — a thank-you email after someone finishes a course video, or a nudge to people who dropped off halfway.
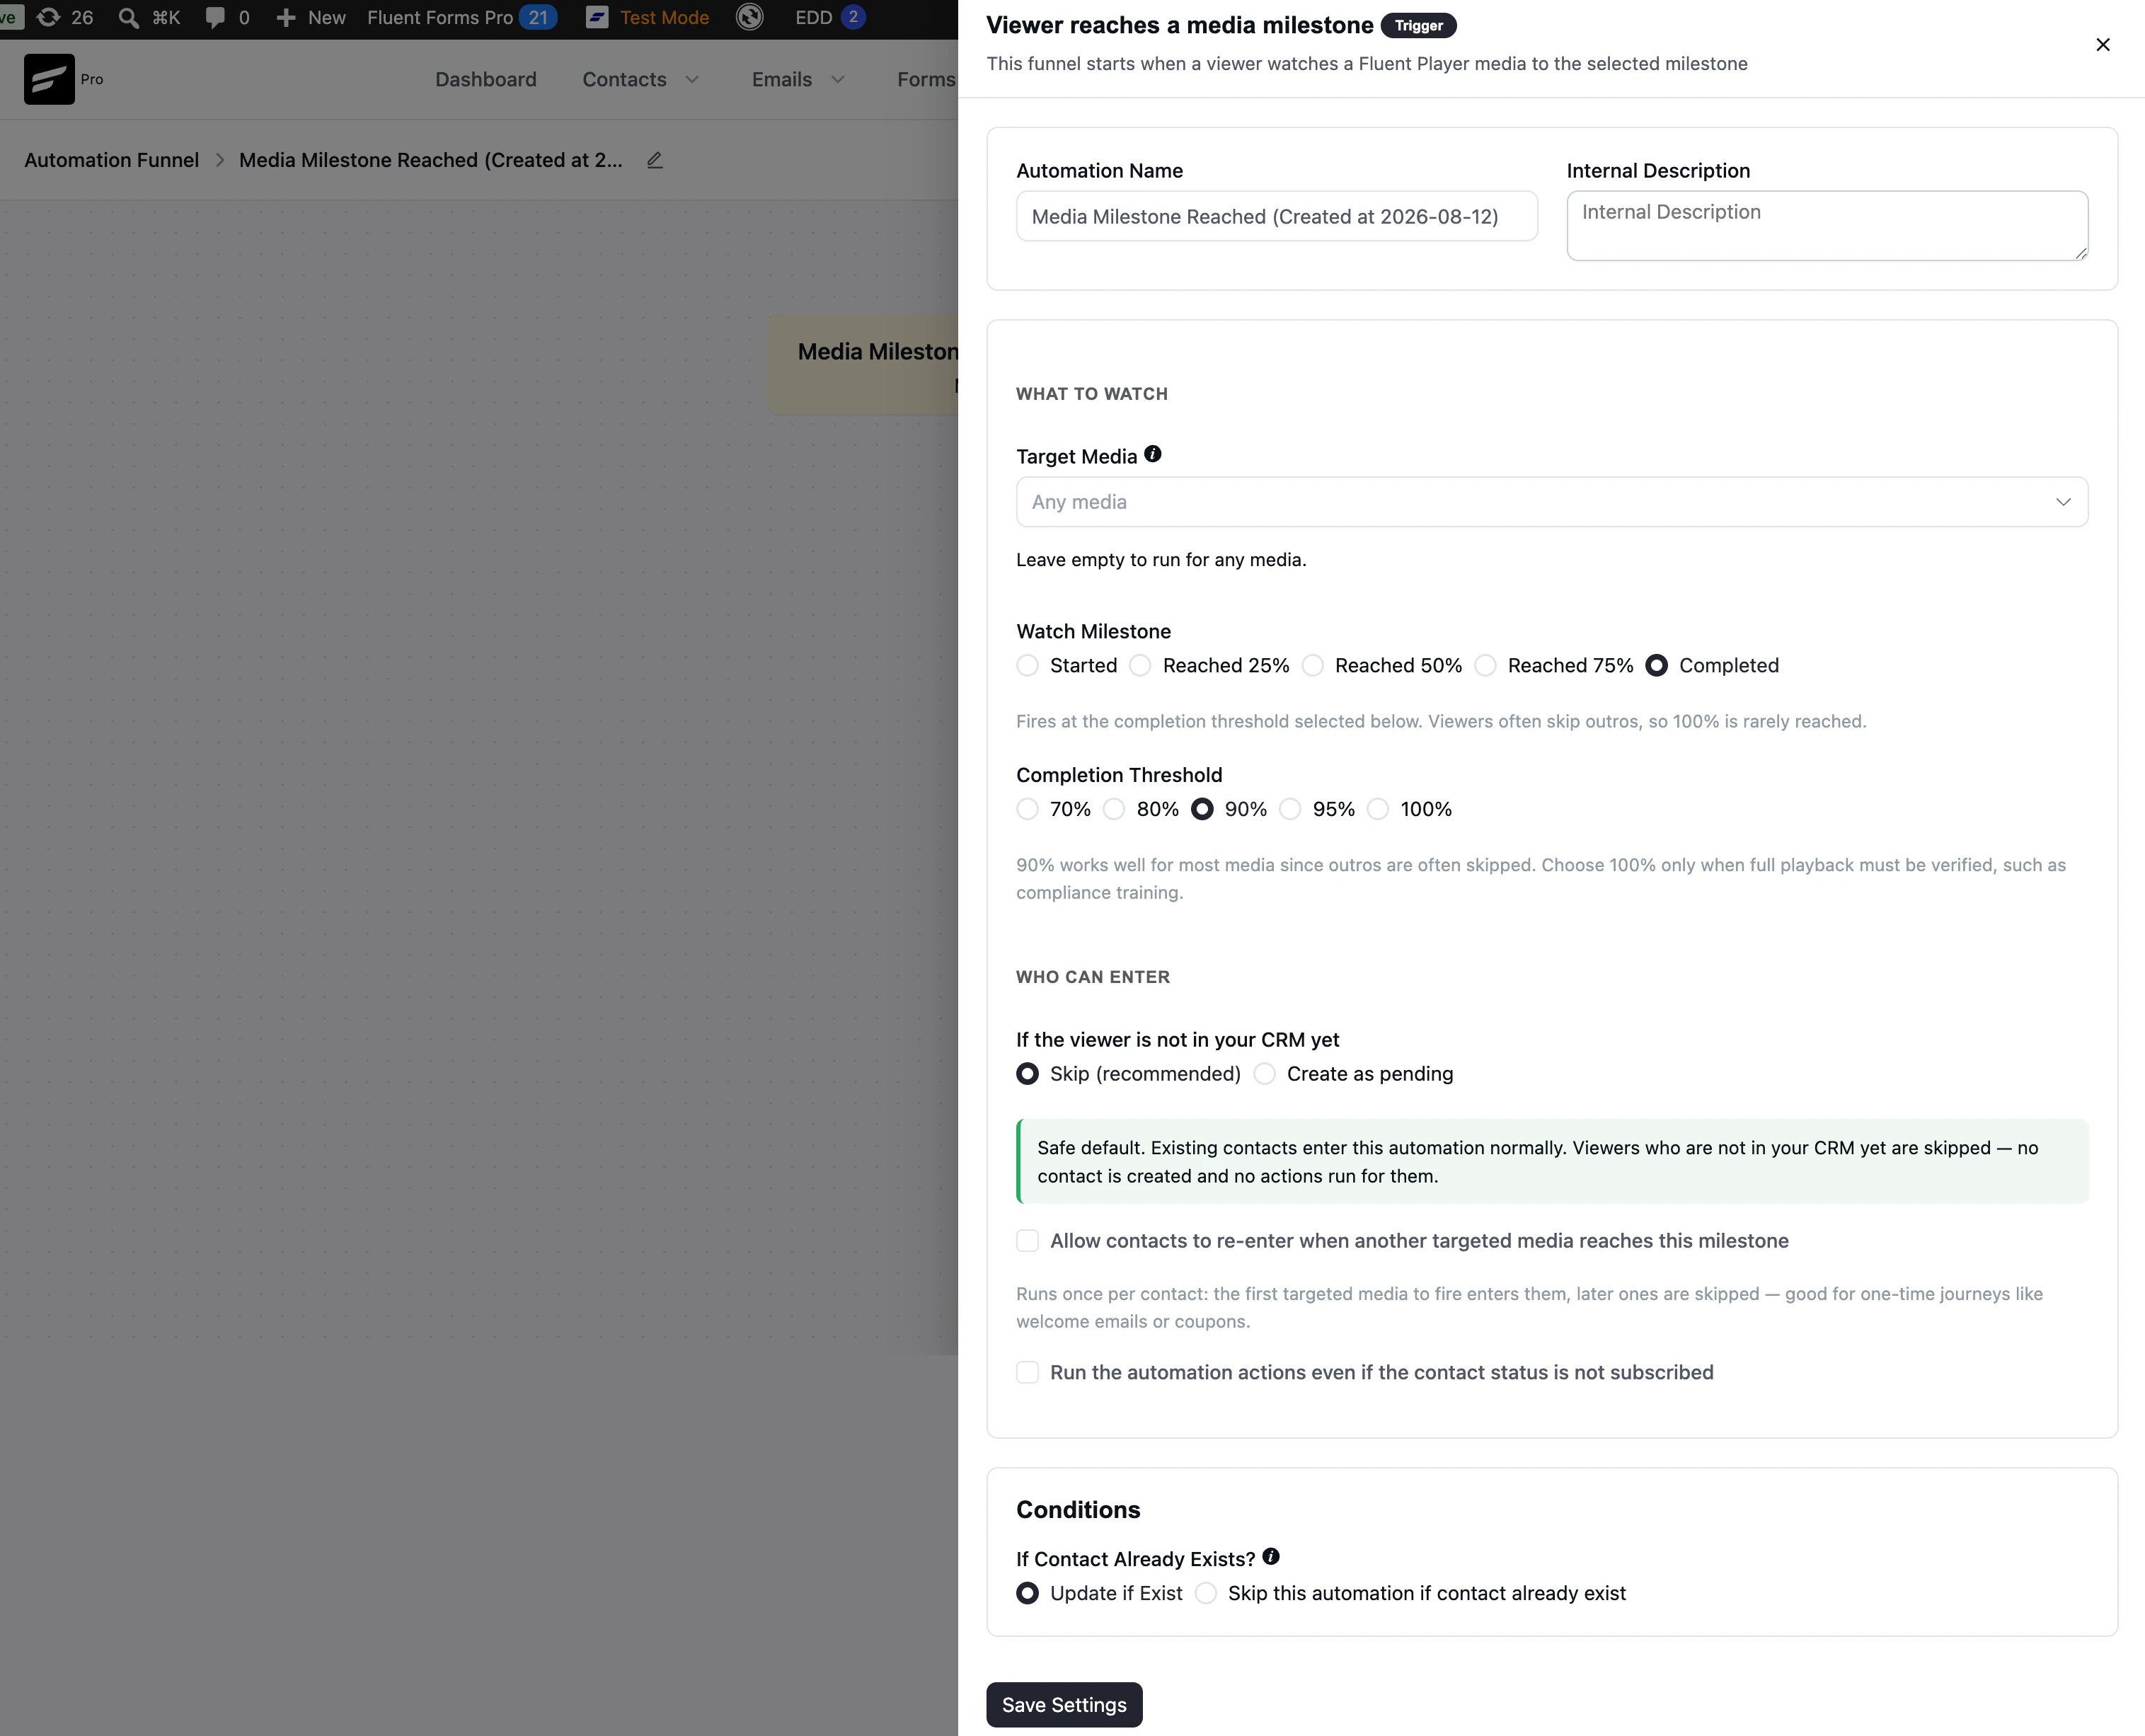
What to watch
| Setting | What it does |
|---|---|
| Target Media | The video(s) this automation listens to. Leave it empty to run for any media. |
| Watch Milestone | Which point starts the automation: Started, Reached 25%, Reached 50%, Reached 75%, or Completed. |
| Completion Threshold | Only applies to Completed. Sets how much of the video counts as finished (70–100%). |
Who can enter
If the viewer is not in your CRM yet decides what happens when someone watches who is not a contact:
- Skip (recommended) — existing contacts enter the automation normally; unknown viewers are ignored. No contact is created and no actions run for them.
- Create as pending — the viewer is added as a pending contact and sent a double opt-in email. They only become subscribed after confirming.
Two checkboxes give you finer control:
- Allow contacts to re-enter when another targeted media reaches this milestone — leave this off and the automation runs once per contact: the first video to fire enters them, later ones are skipped. That is what you want for one-time journeys like a welcome email or a coupon. Turn it on if the automation should run again for each video.
- Run the automation actions even if the contact status is not subscribed — normally unsubscribed contacts are left alone. Tick this only when the automation must run regardless of subscription status.
Conditions
If Contact Already Exists controls what happens for people already in your CRM: Update if Exist refreshes their details and lets them continue, while Skip this automation if contact already exist leaves them out entirely.
Click Save Settings, then build out the actions of your automation as normal.
Trigger: Media Layer Interaction
Use this when the interaction is what matters — following up with everyone who acted on a CTA, or with everyone who skipped it.
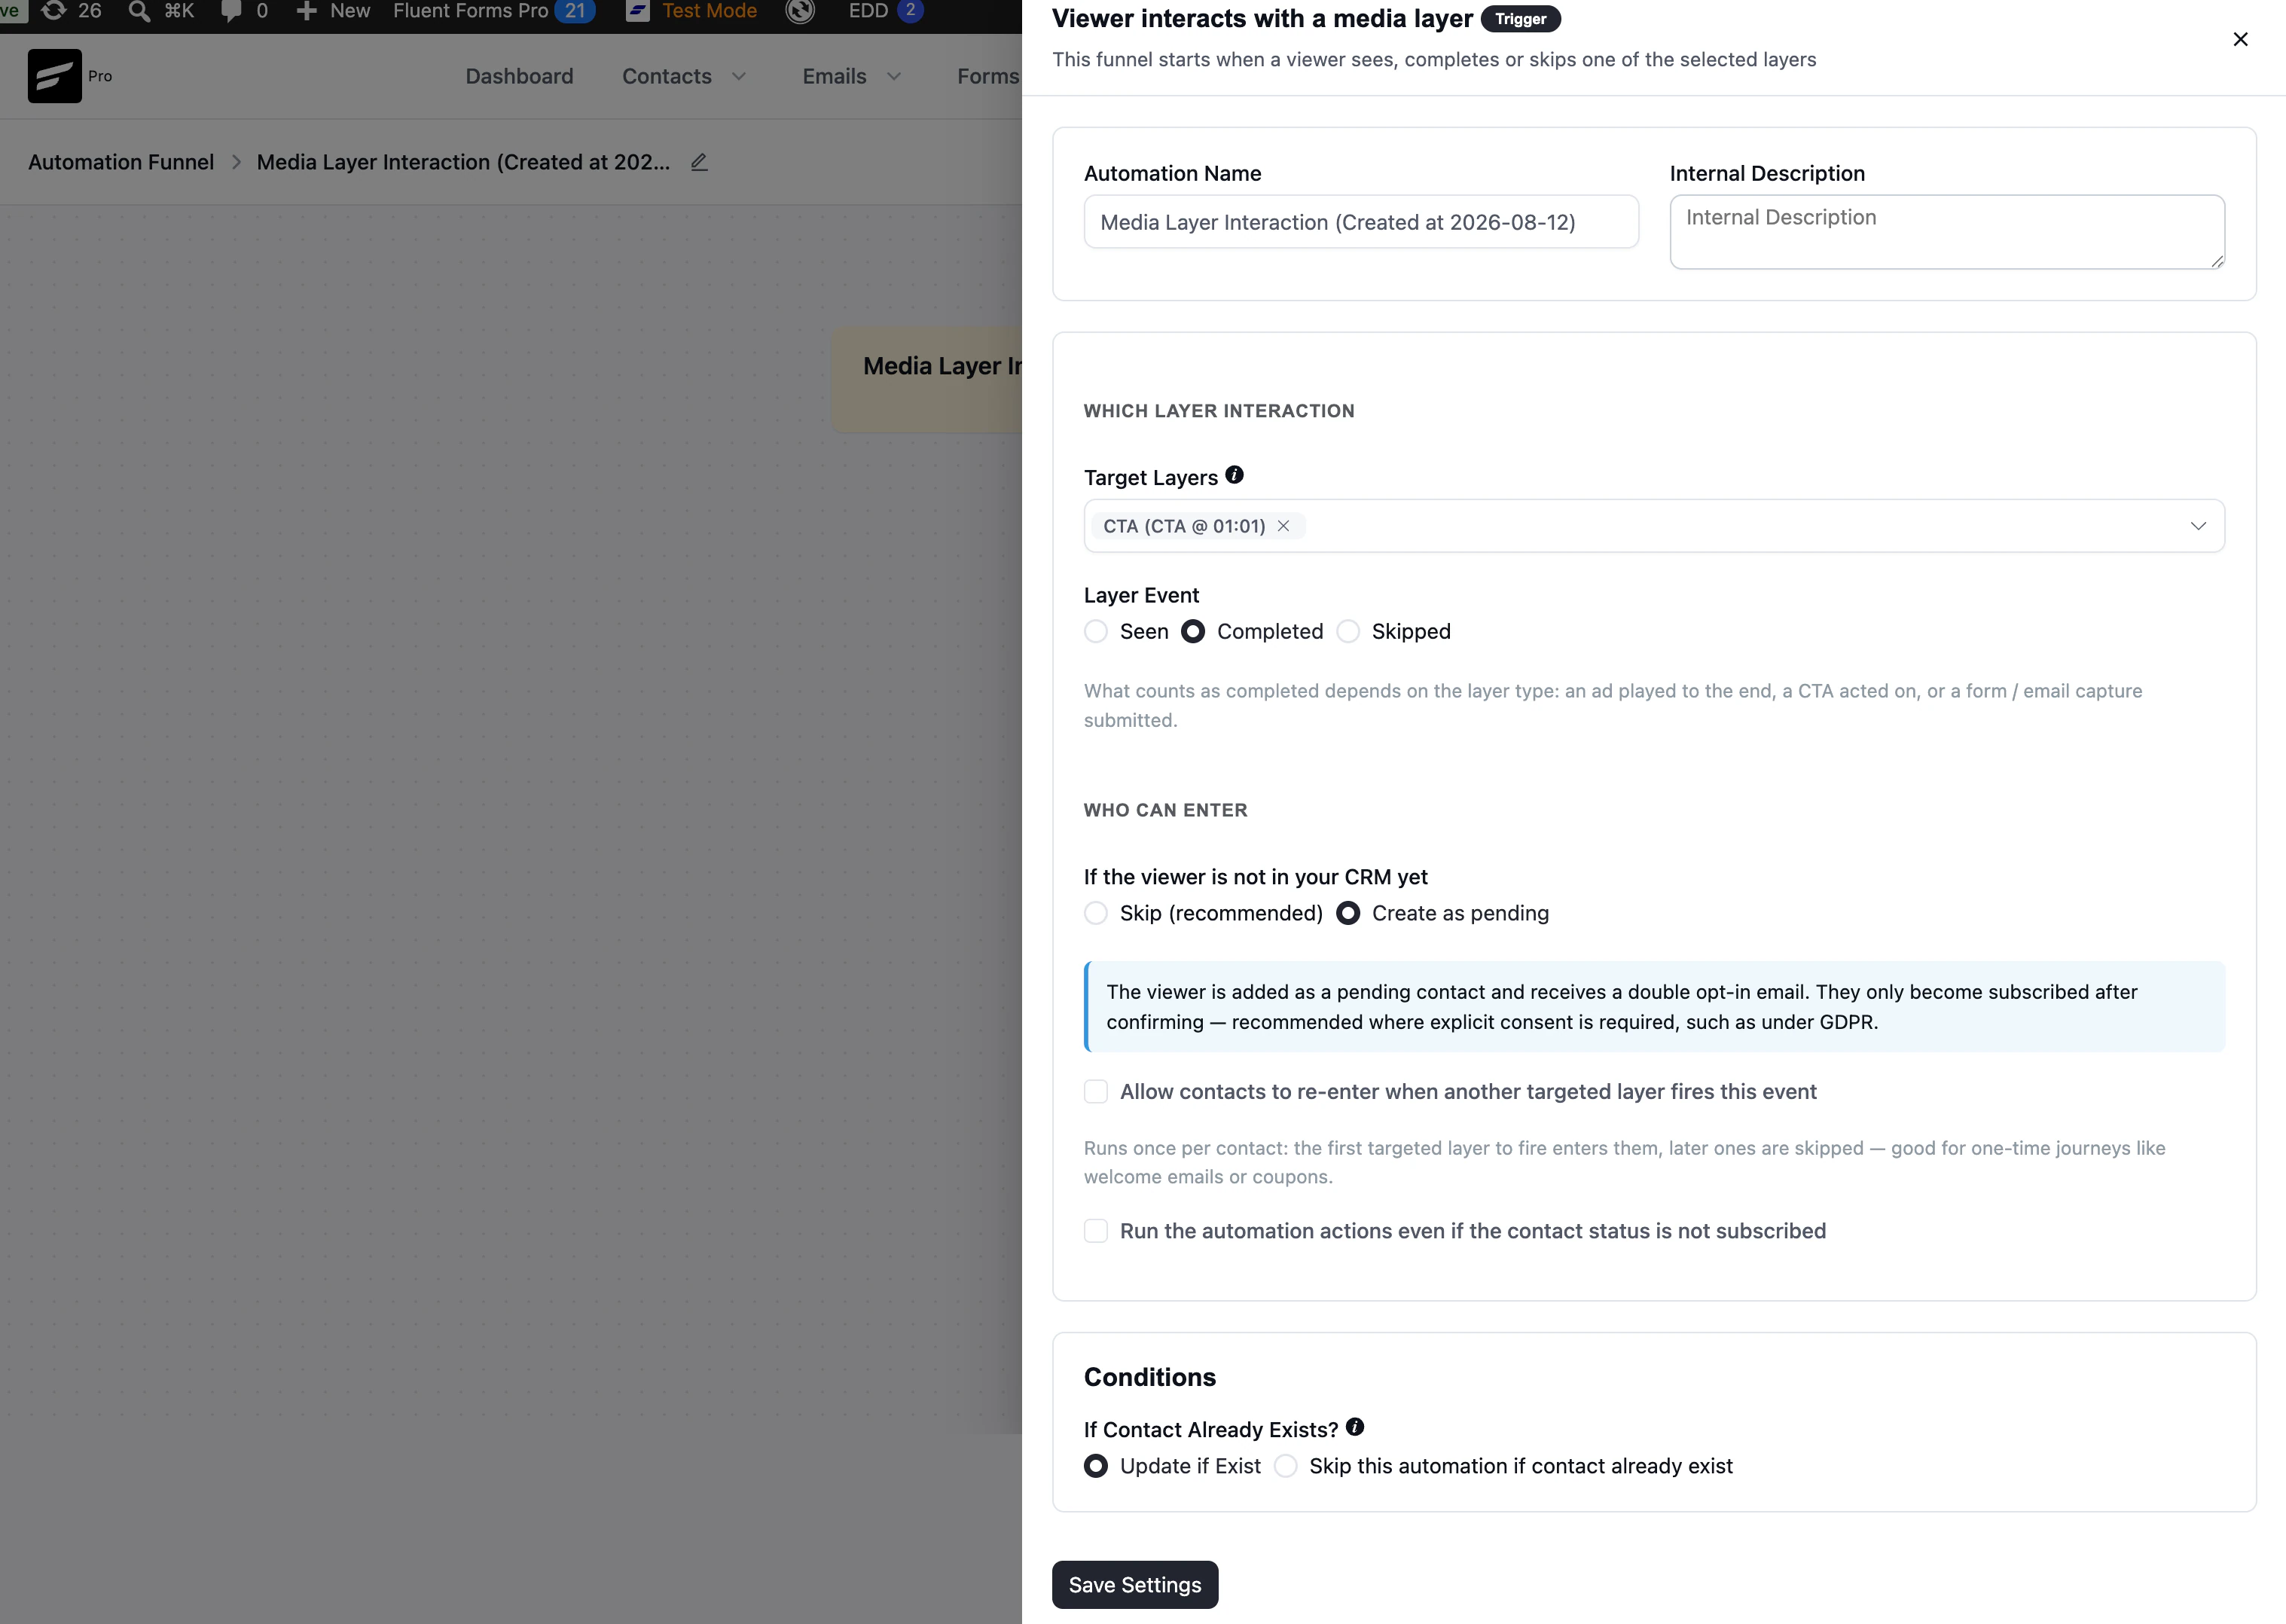
Which layer interaction
| Setting | What it does |
|---|---|
| Target Layers | The specific interactive layers this automation listens to. Each one is listed with its type and timestamp, such as CTA (CTA @ 01:01). |
| Layer Event | Seen, Completed, or Skipped. |
What counts as Completed depends on the layer type: an ad played to the end, a CTA acted on, or a form / email capture submitted.
Who can enter and Conditions
These work exactly as described for the milestone trigger above — the only difference is the re-entry checkbox, which here reads Allow contacts to re-enter when another targeted layer fires this event.
A good default for this trigger
Because a layer interaction is usually a deliberate action, Create as pending is often the right choice here — the viewer is added as a pending contact and receives a double opt-in email, which is the safer route where explicit consent is required, such as under GDPR.
Capturing Emails into FluentCRM
Watch activity is only half of the integration. FluentPlayer can also collect email addresses mid-video and send them straight to FluentCRM as new contacts, with the lists and tags you choose.
That is handled by the email capture overlay, with FluentCRM selected as the email provider. Every submission is saved in two places: under FluentPlayer → Analytics → Emails, and as a contact in FluentCRM → Contacts.
Personalizing Your Video with FluentCRM Data
With FluentCRM connected, you can pull contact details into your overlays, titles, and timed content using smartcodes — for example {{contact.first_name}} to greet a viewer by name. See Smartcodes and Personalization for the full list.
Troubleshooting
Nothing appears on the contact timeline. Check all three in order: Log playback to contact timeline is on in FluentPlayer, the Event Tracking Module is enabled in FluentCRM → Addons, and the video you are testing is included under Which media.
Activity is logged, but only for some viewers. FluentPlayer can only attribute activity to a viewer it can identify — a logged-in user, or someone already recognised as a contact. Anonymous visitors have nothing to attach the events to.
The automation never runs. Confirm the automation is Published rather than a draft, and check the If the viewer is not in your CRM yet setting — with Skip (recommended) selected, viewers who are not yet contacts will not enter it.
A contact only entered the automation once. That is the default. Tick the re-entry checkbox in the trigger settings if you want it to run for each targeted media or layer.