

Appearance
Cloudflare R2 & Stream (Pro)
FluentPlayer Pro connects to Cloudflare in two ways, so you can host and deliver your videos on Cloudflare's global network instead of loading them from your own server. This single integration covers both options:
- Cloudflare R2 S3-compatible object storage with zero egress fees. You upload ready-to-play video files to a bucket, and FluentPlayer serves them through Cloudflare.
- Cloudflare Stream a fully managed video platform that encodes your uploads into adaptive HLS and supports per-video signed (private) playback.
You only need to set up the one that matches how you want to host your videos. This guide walks through both.
Pro feature
The Cloudflare R2 and Cloudflare Stream integrations require FluentPlayer Pro. Install and activate the free FluentPlayer plugin first, then activate Pro.
R2 vs Stream — Which Should You Use?
Both are excellent choices the right one depends on the files you already have and how much video processing you want Cloudflare to do for you.
| Cloudflare R2 | Cloudflare Stream | |
|---|---|---|
| Best for | Hosting your own ready-to-play video files cheaply | Hands-off encoding and adaptive streaming |
| Encoding | None — you upload the final file | Automatic (multiple qualities, adaptive HLS) |
| Delivery | Direct file over Cloudflare's CDN | Adaptive HLS |
| Private videos | Public bucket URL | Per-video signed playback tokens |
| Pricing model | Storage + operations, zero egress | Per minute stored and delivered |
| You provide | Account ID, Access Key, Secret Key, Bucket, Public URL | Account ID, API Token |
TIP
Choose R2 when you already have encoded video files and want the lowest-cost, self-managed hosting. Choose Stream when you want Cloudflare to handle encoding, adaptive quality, and signed playback for you.
Option 1: Cloudflare R2
What You Need
- A Cloudflare account with R2 Object Storage enabled.
- FluentPlayer Pro active on your site.
You will collect four things from Cloudflare your Account ID, an Access Key ID and Secret Access Key, the bucket name, and the bucket's public URL — then paste them into FluentPlayer.
Step 1: Find Your Account ID
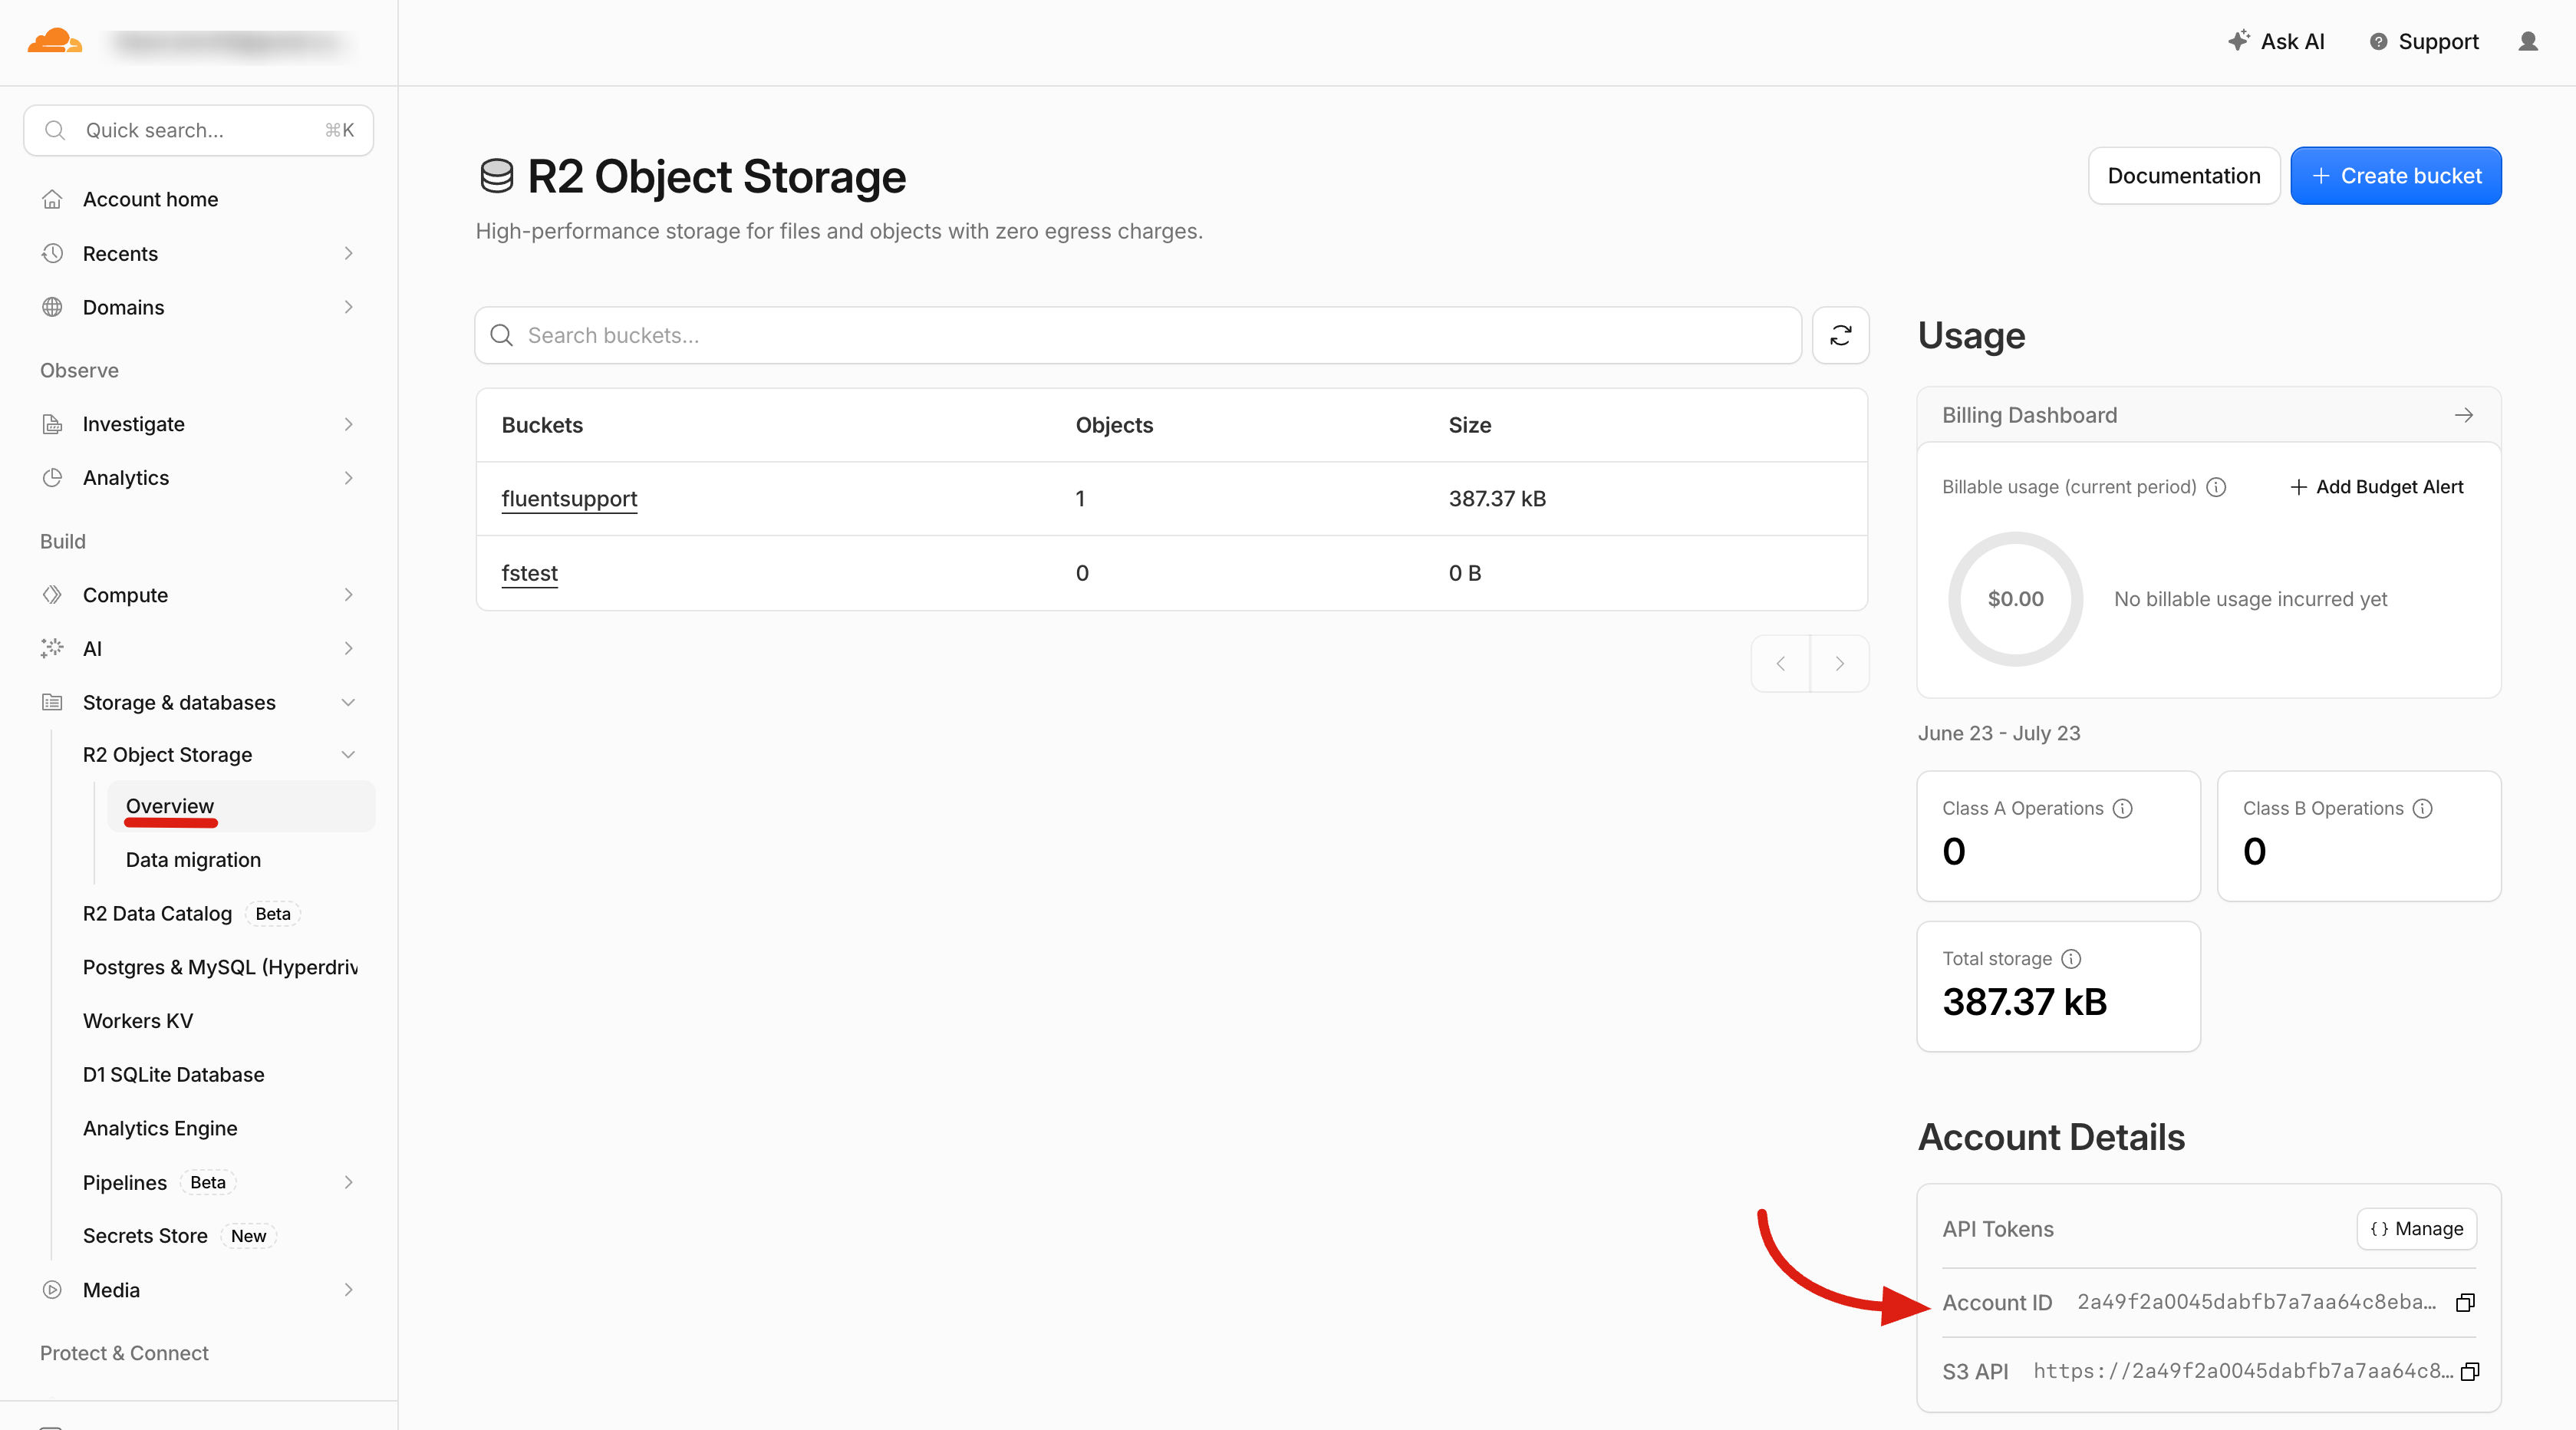
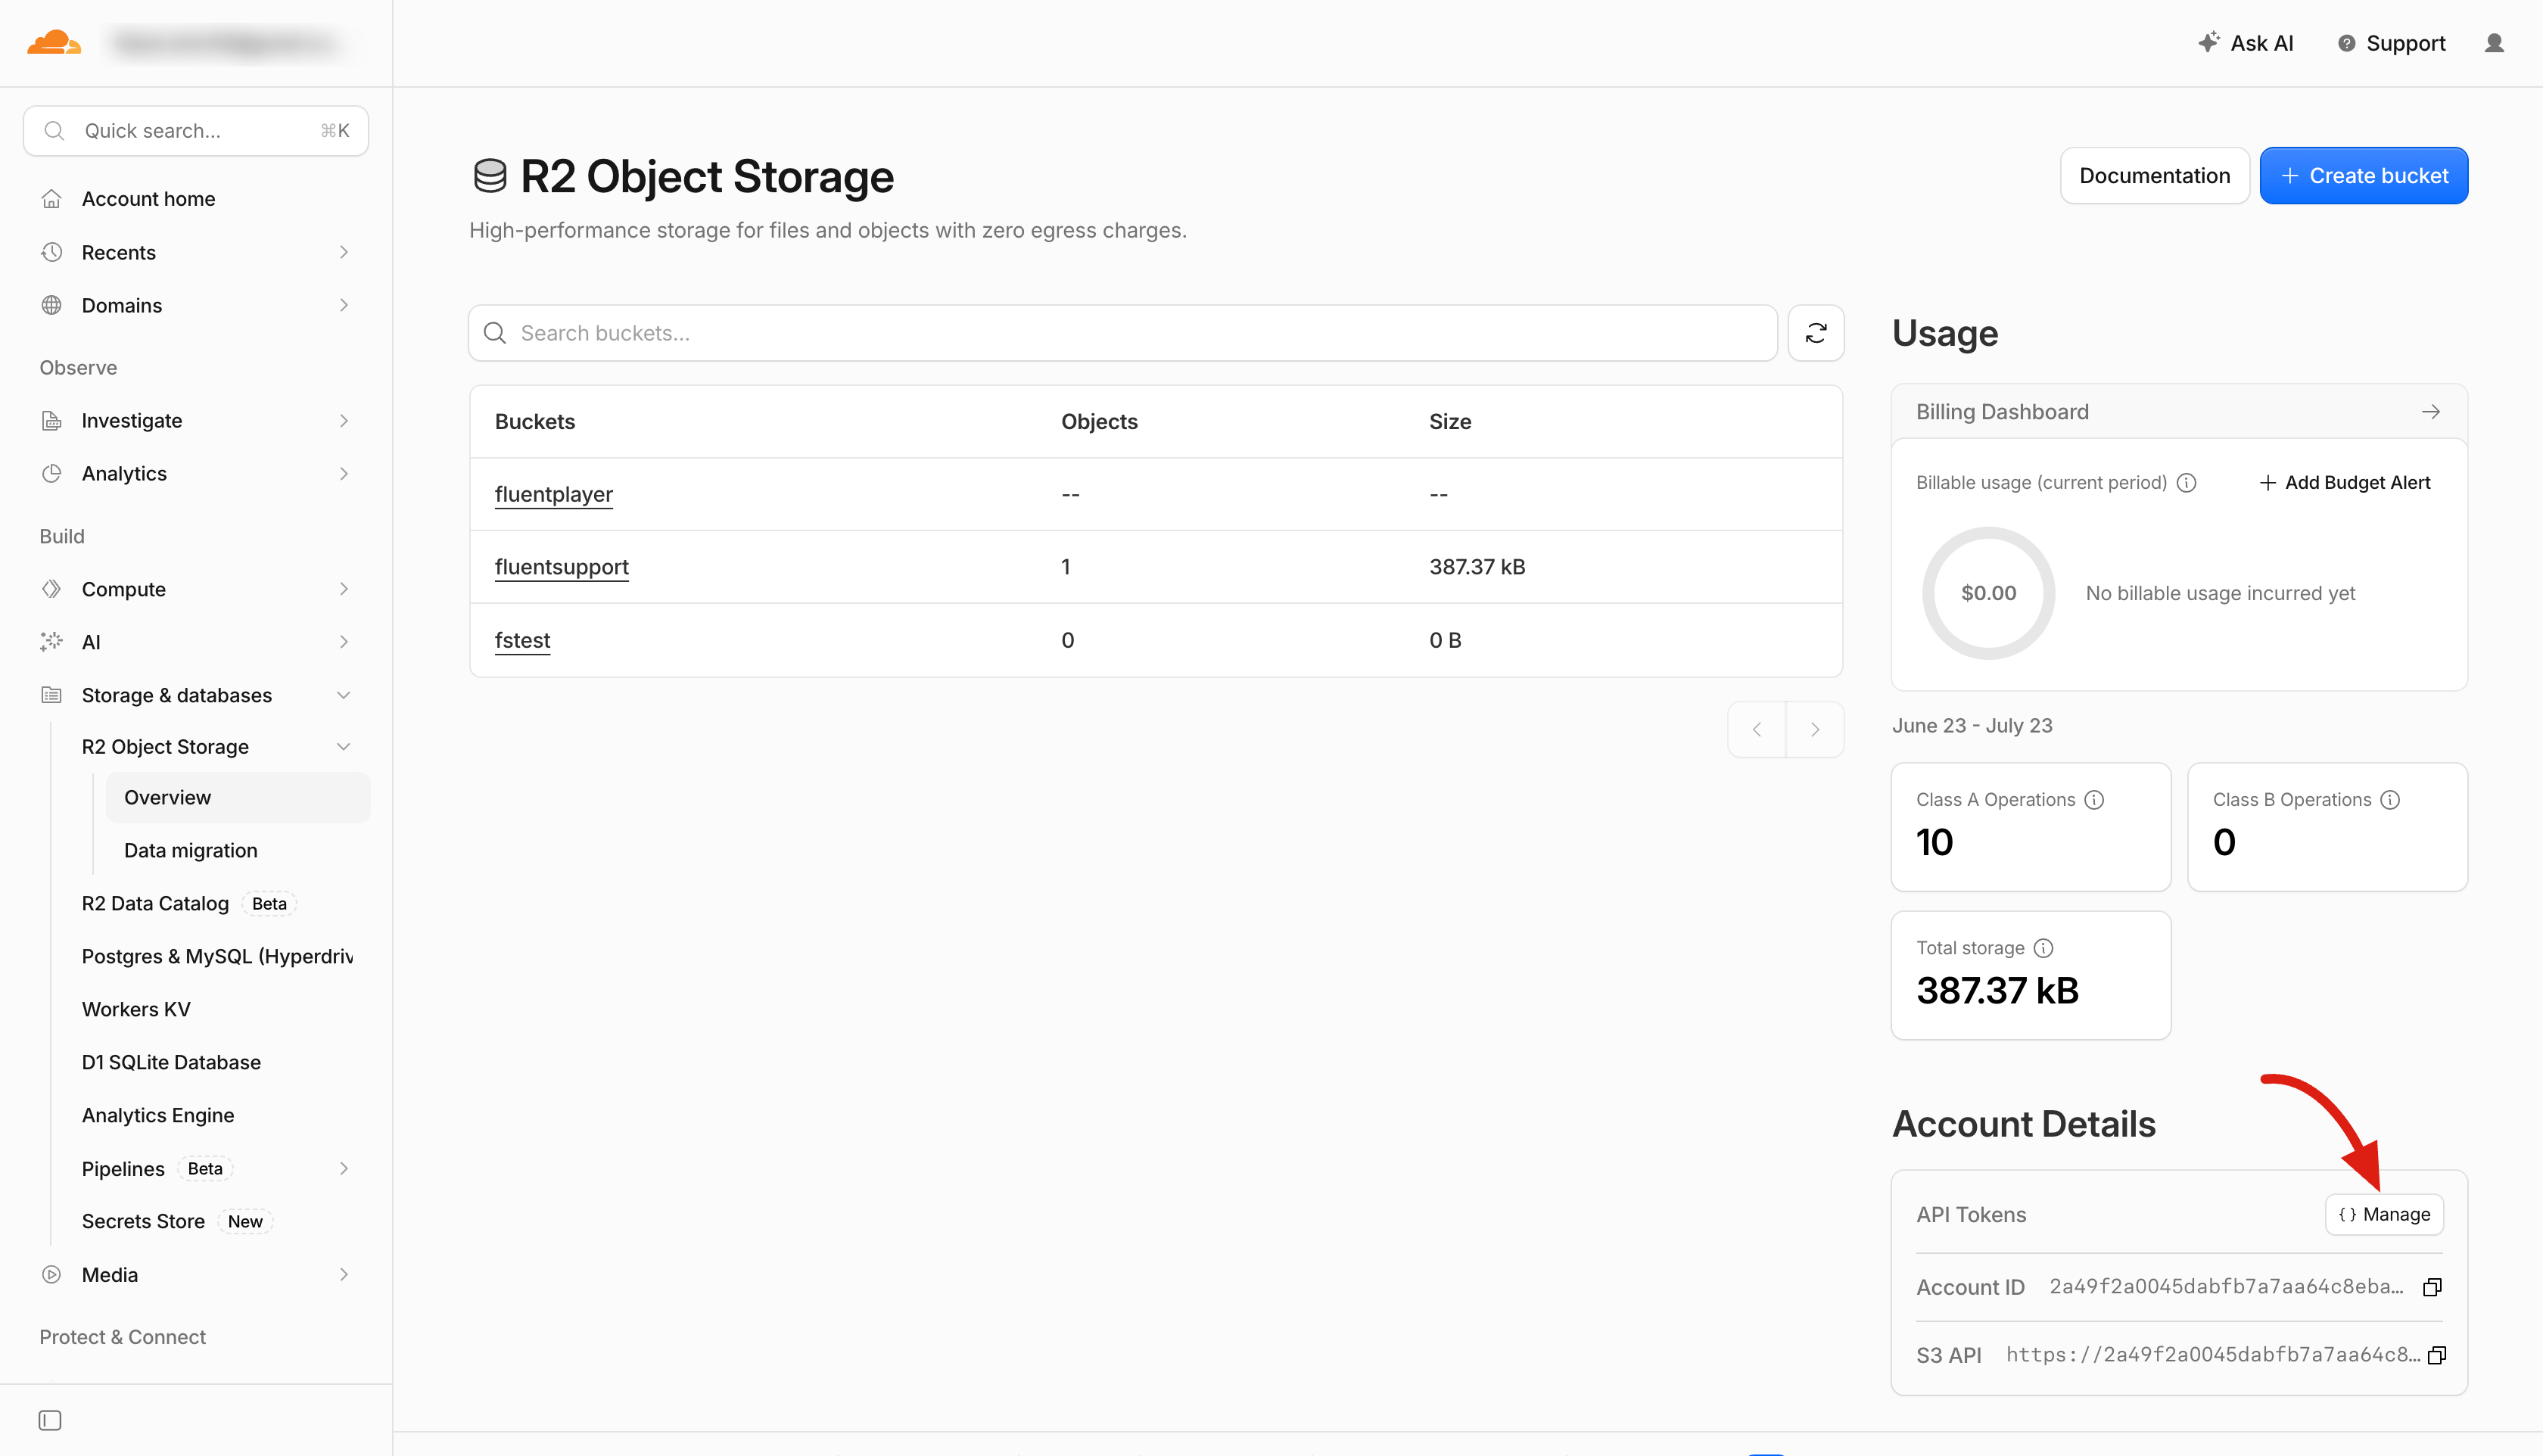
Log in to your Cloudflare dashboard and go to R2 Object Storage → Overview. On the right side of the page, find the Account Details box — your Account ID is listed here. Click the copy icon to save it for later.
Step 2: Create an R2 Bucket
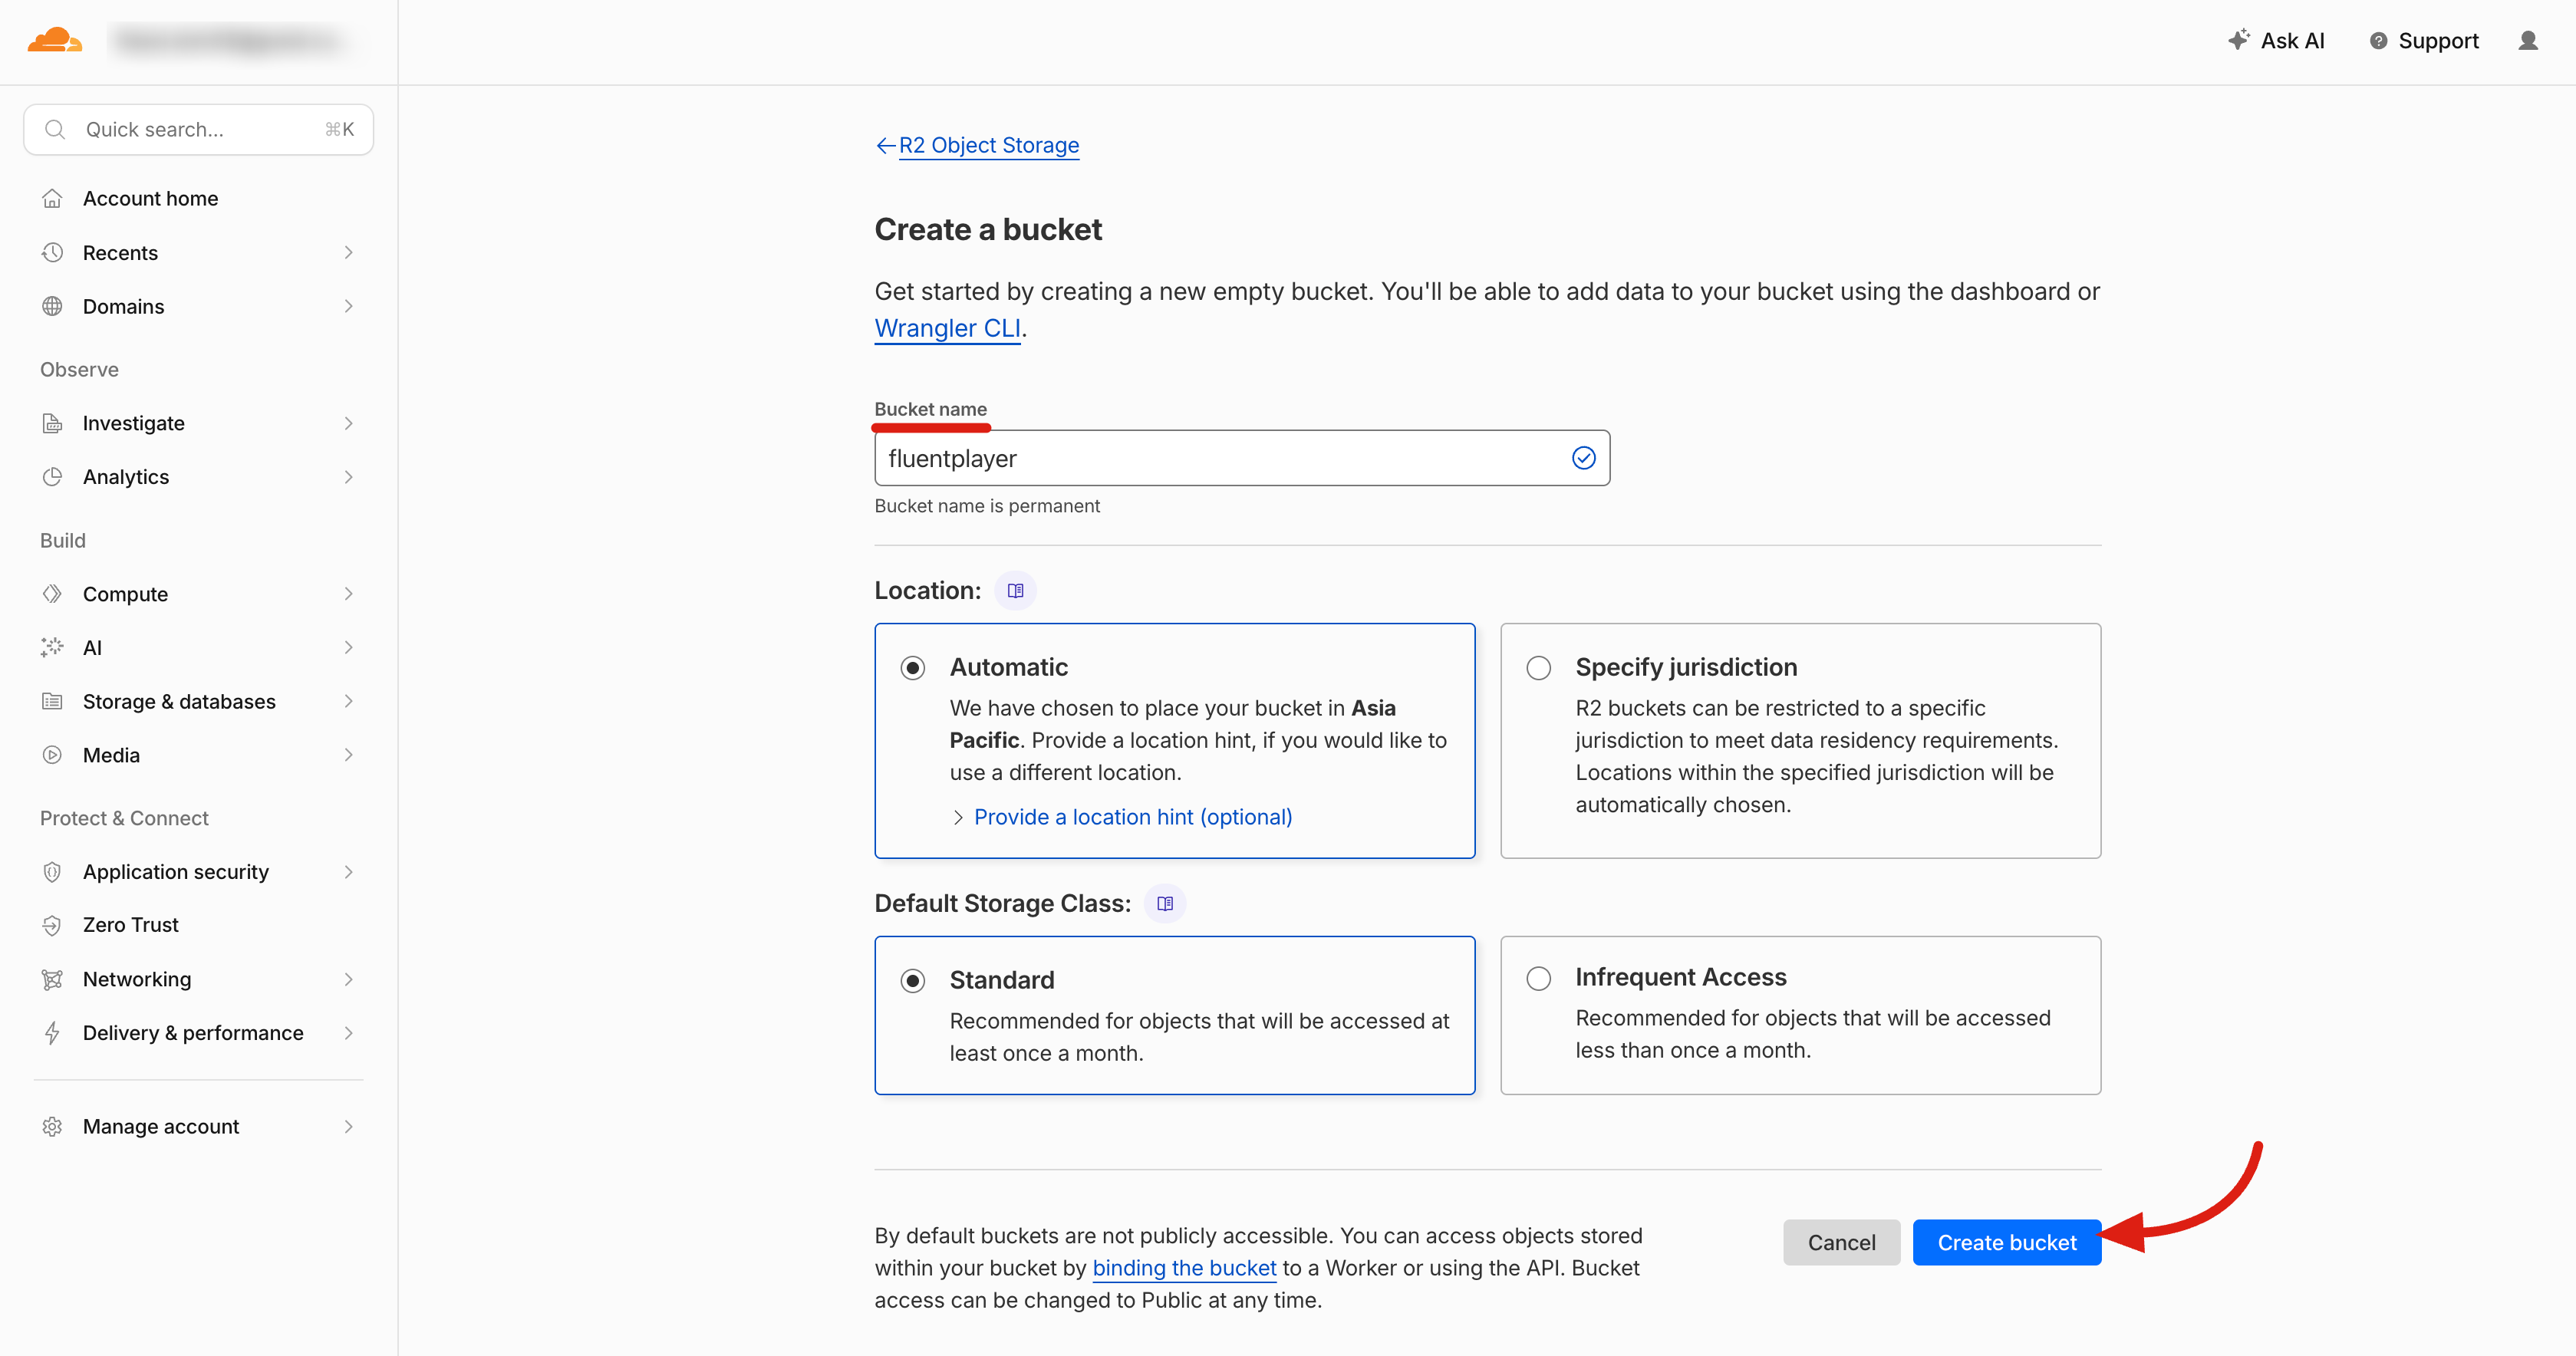
On the same R2 Object Storage page, click Create bucket.
- Enter a Bucket name that is easy to recognize (for example,
fluentplayer). The name is permanent. - Leave Location on Automatic and Default Storage Class on Standard unless you have a specific reason to change them.
- Click Create bucket.
Step 3: Enable Public Access
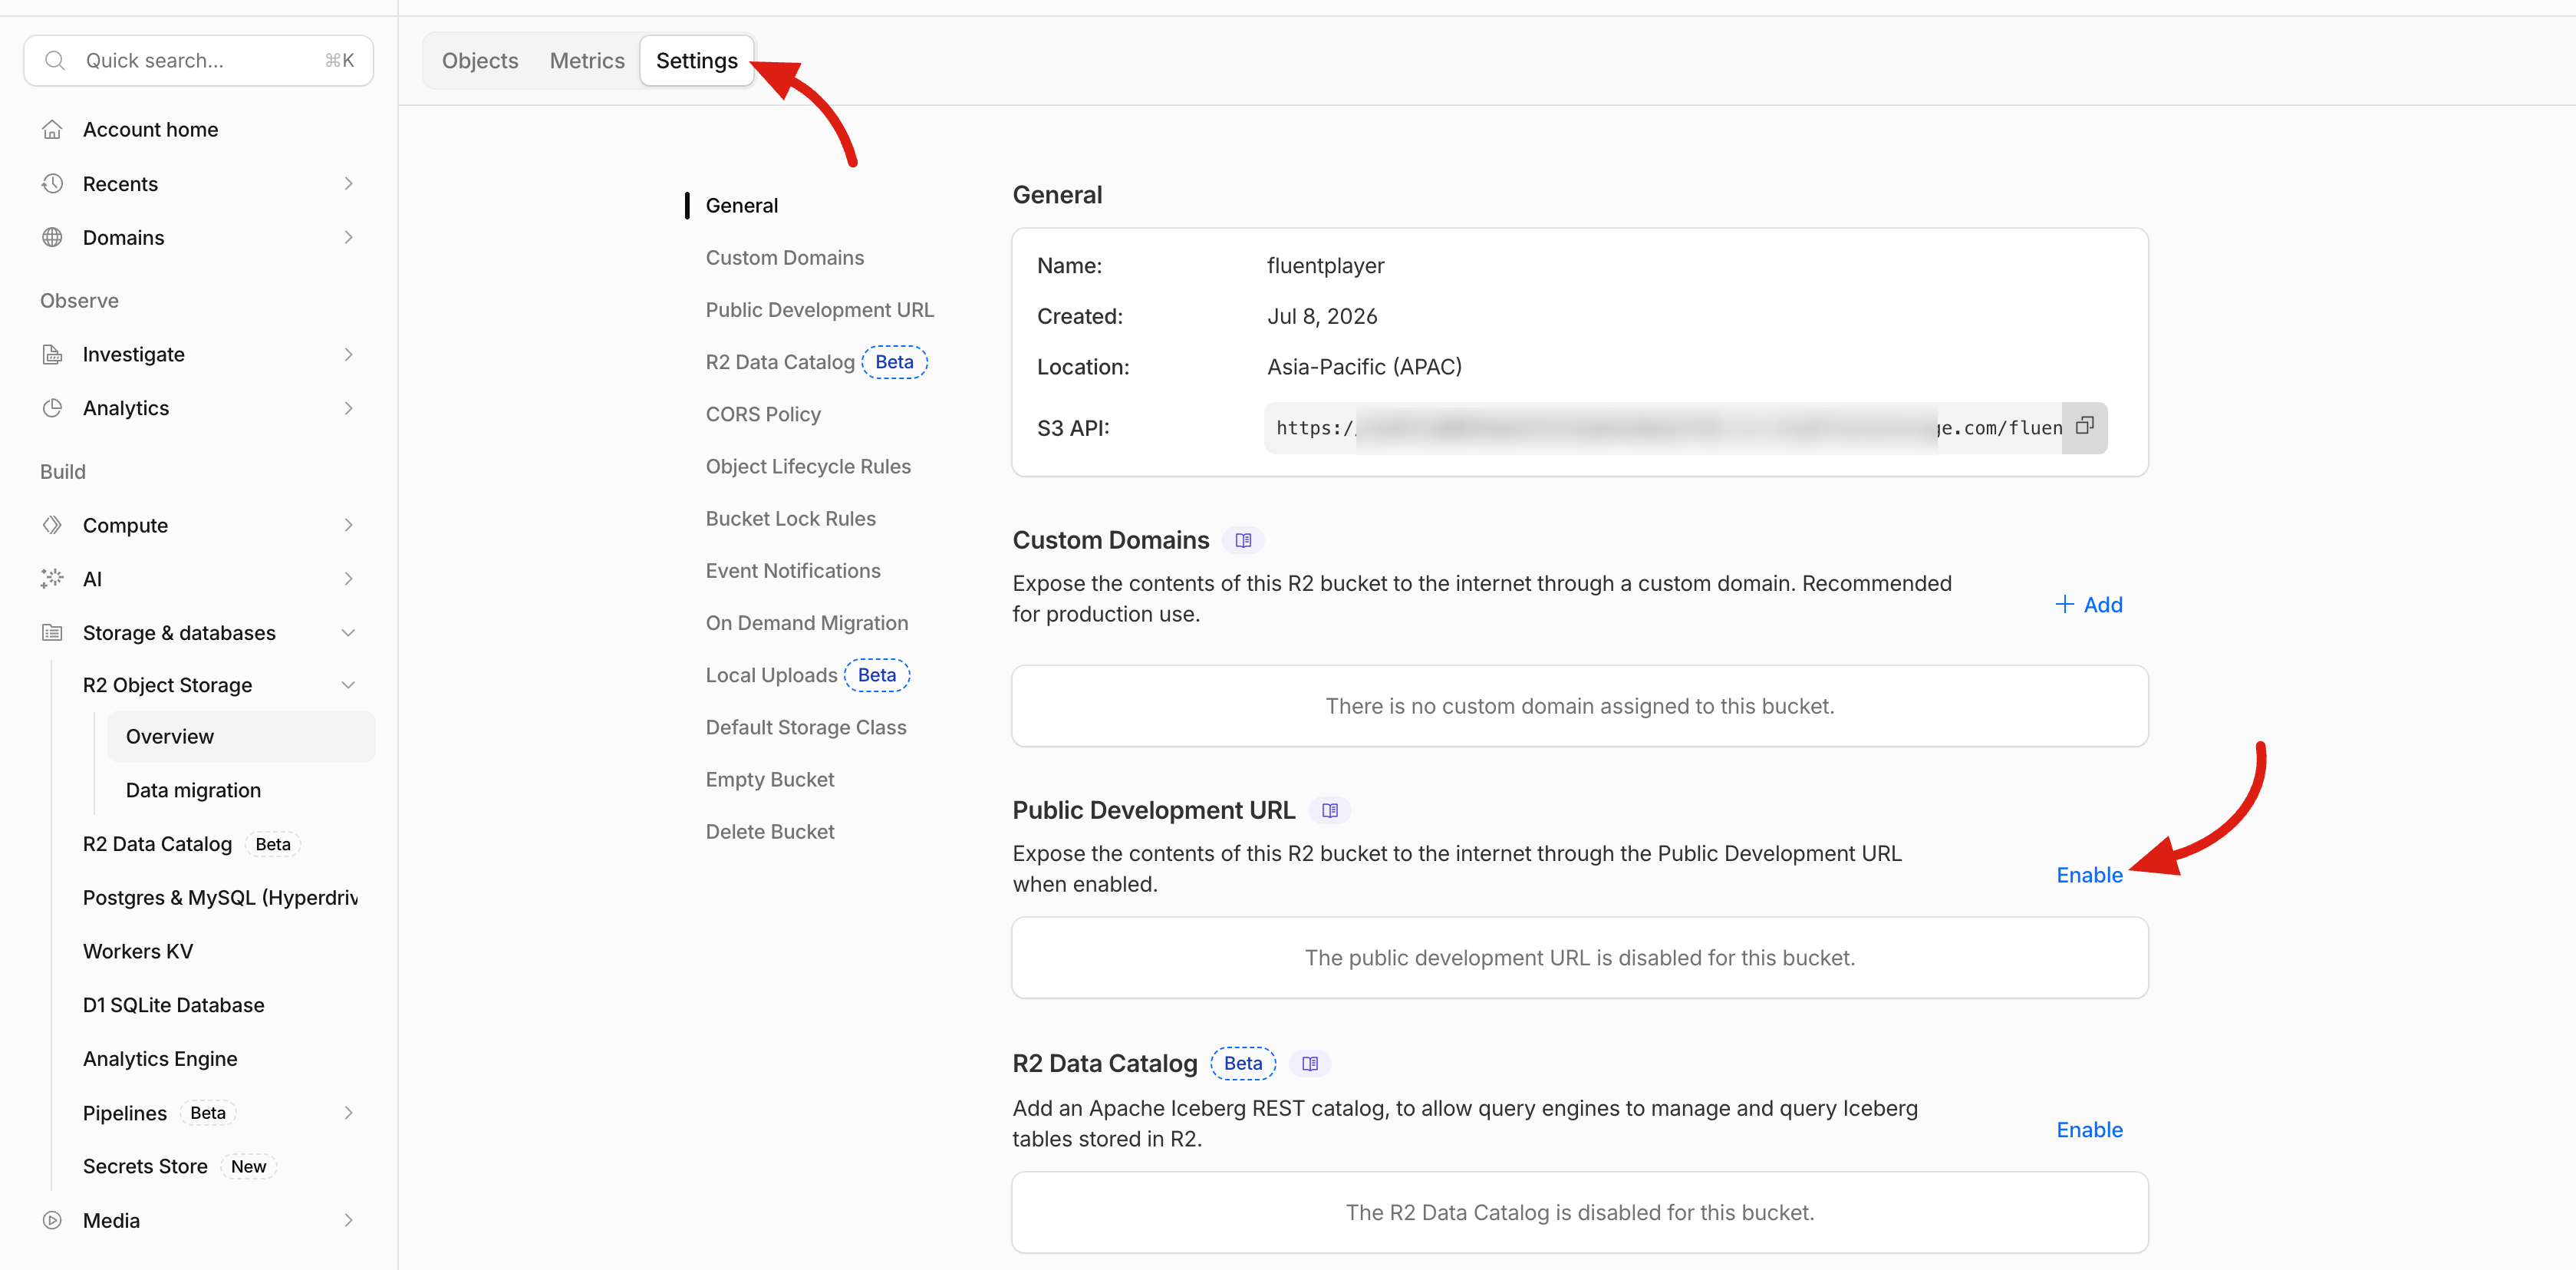
Your videos need a public URL so viewers can play them. Open your new bucket and switch to the Settings tab, then find the Public Development URL section and click Enable.
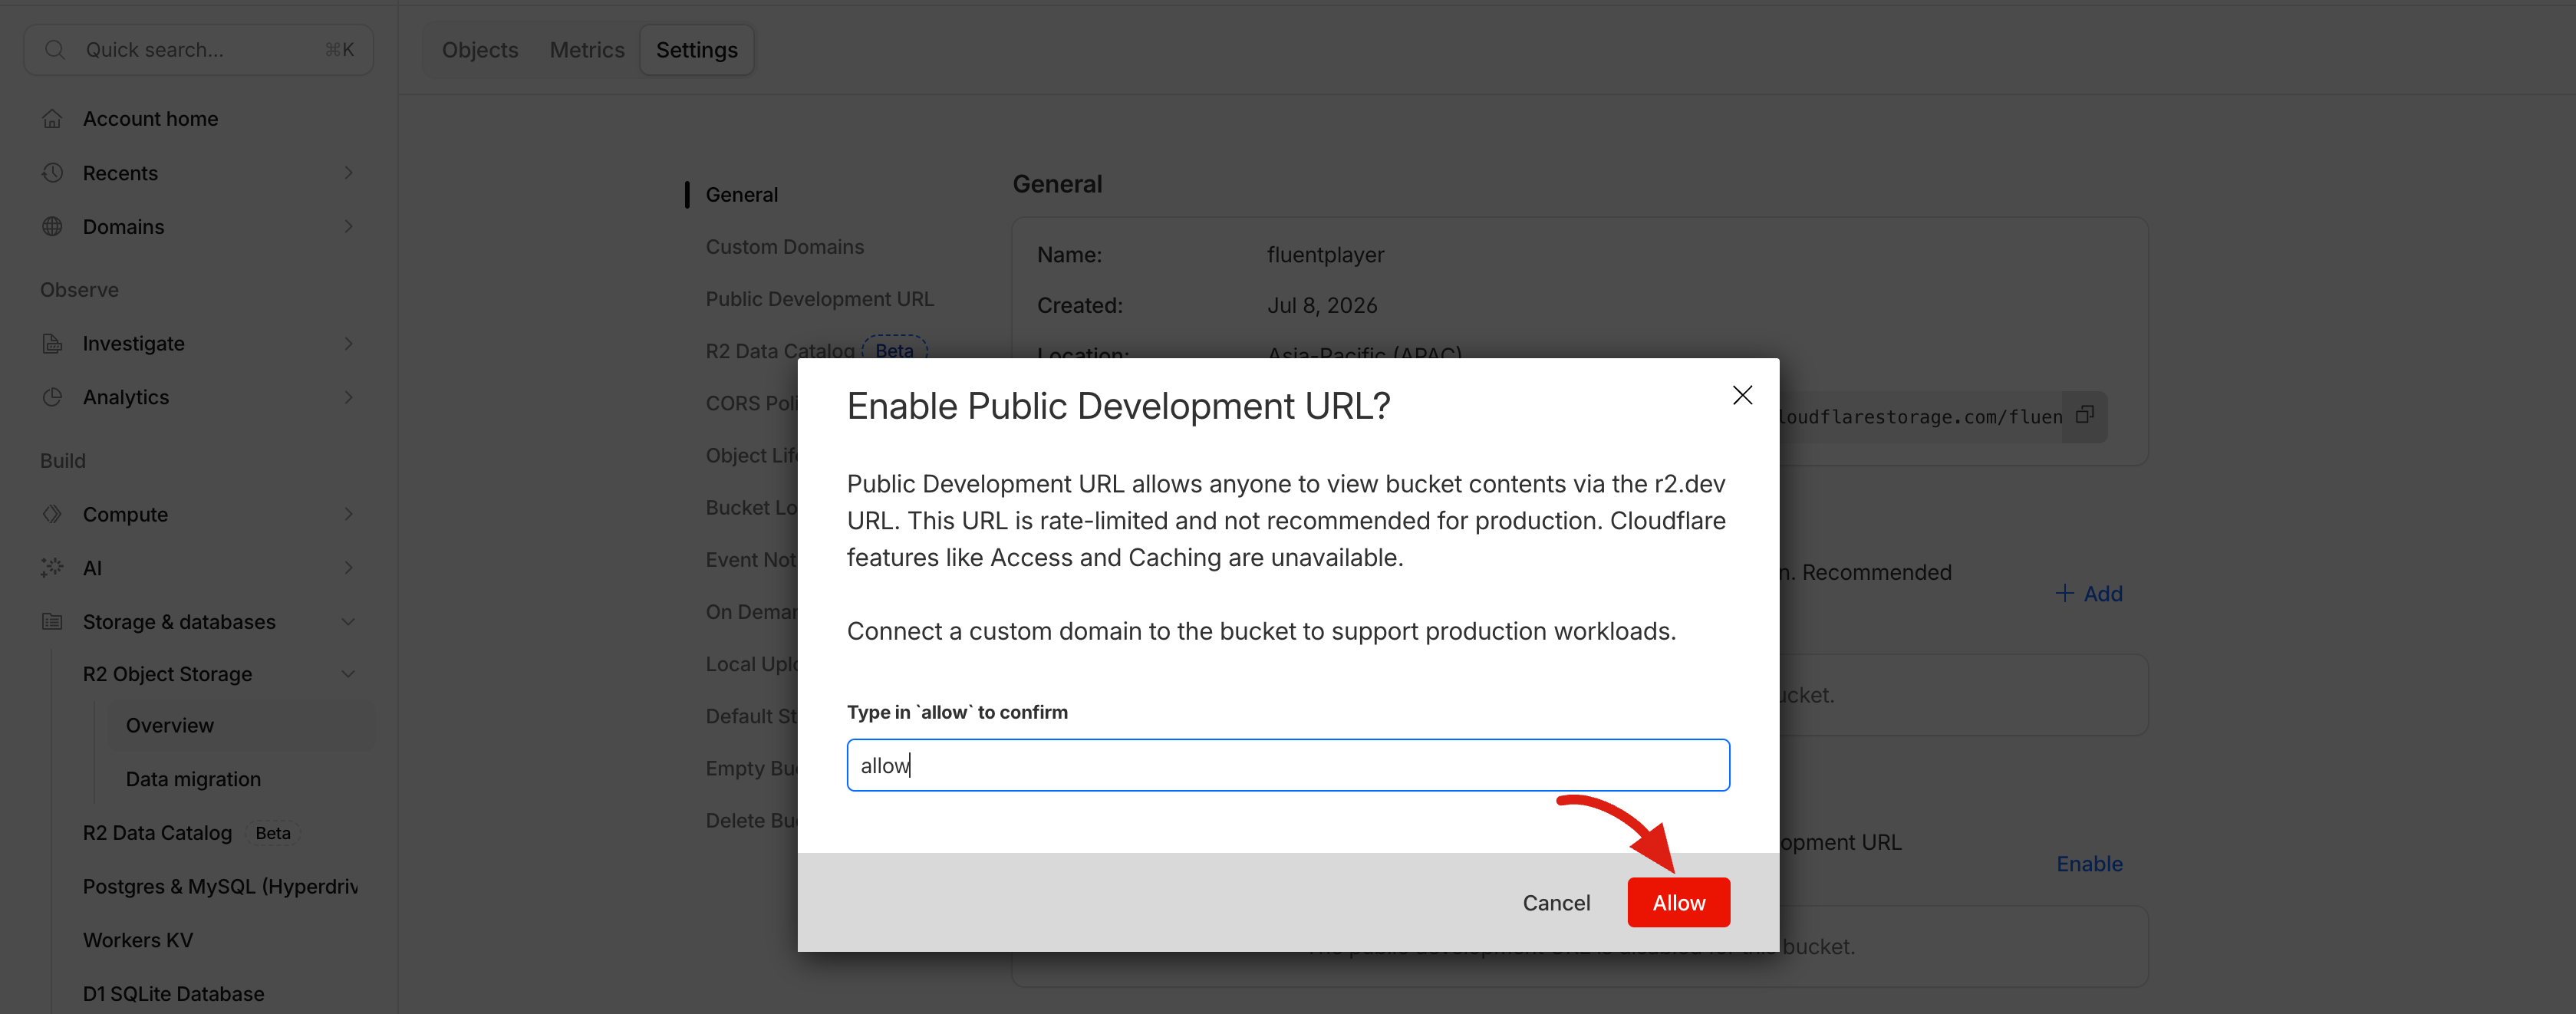
A confirmation dialog appears. Type allow in the field, then click Allow.
Cloudflare now shows the public URL for your bucket (it looks like https://pub-xxxx.r2.dev). Copy this — it's your Cloudflare Bucket Public URL.
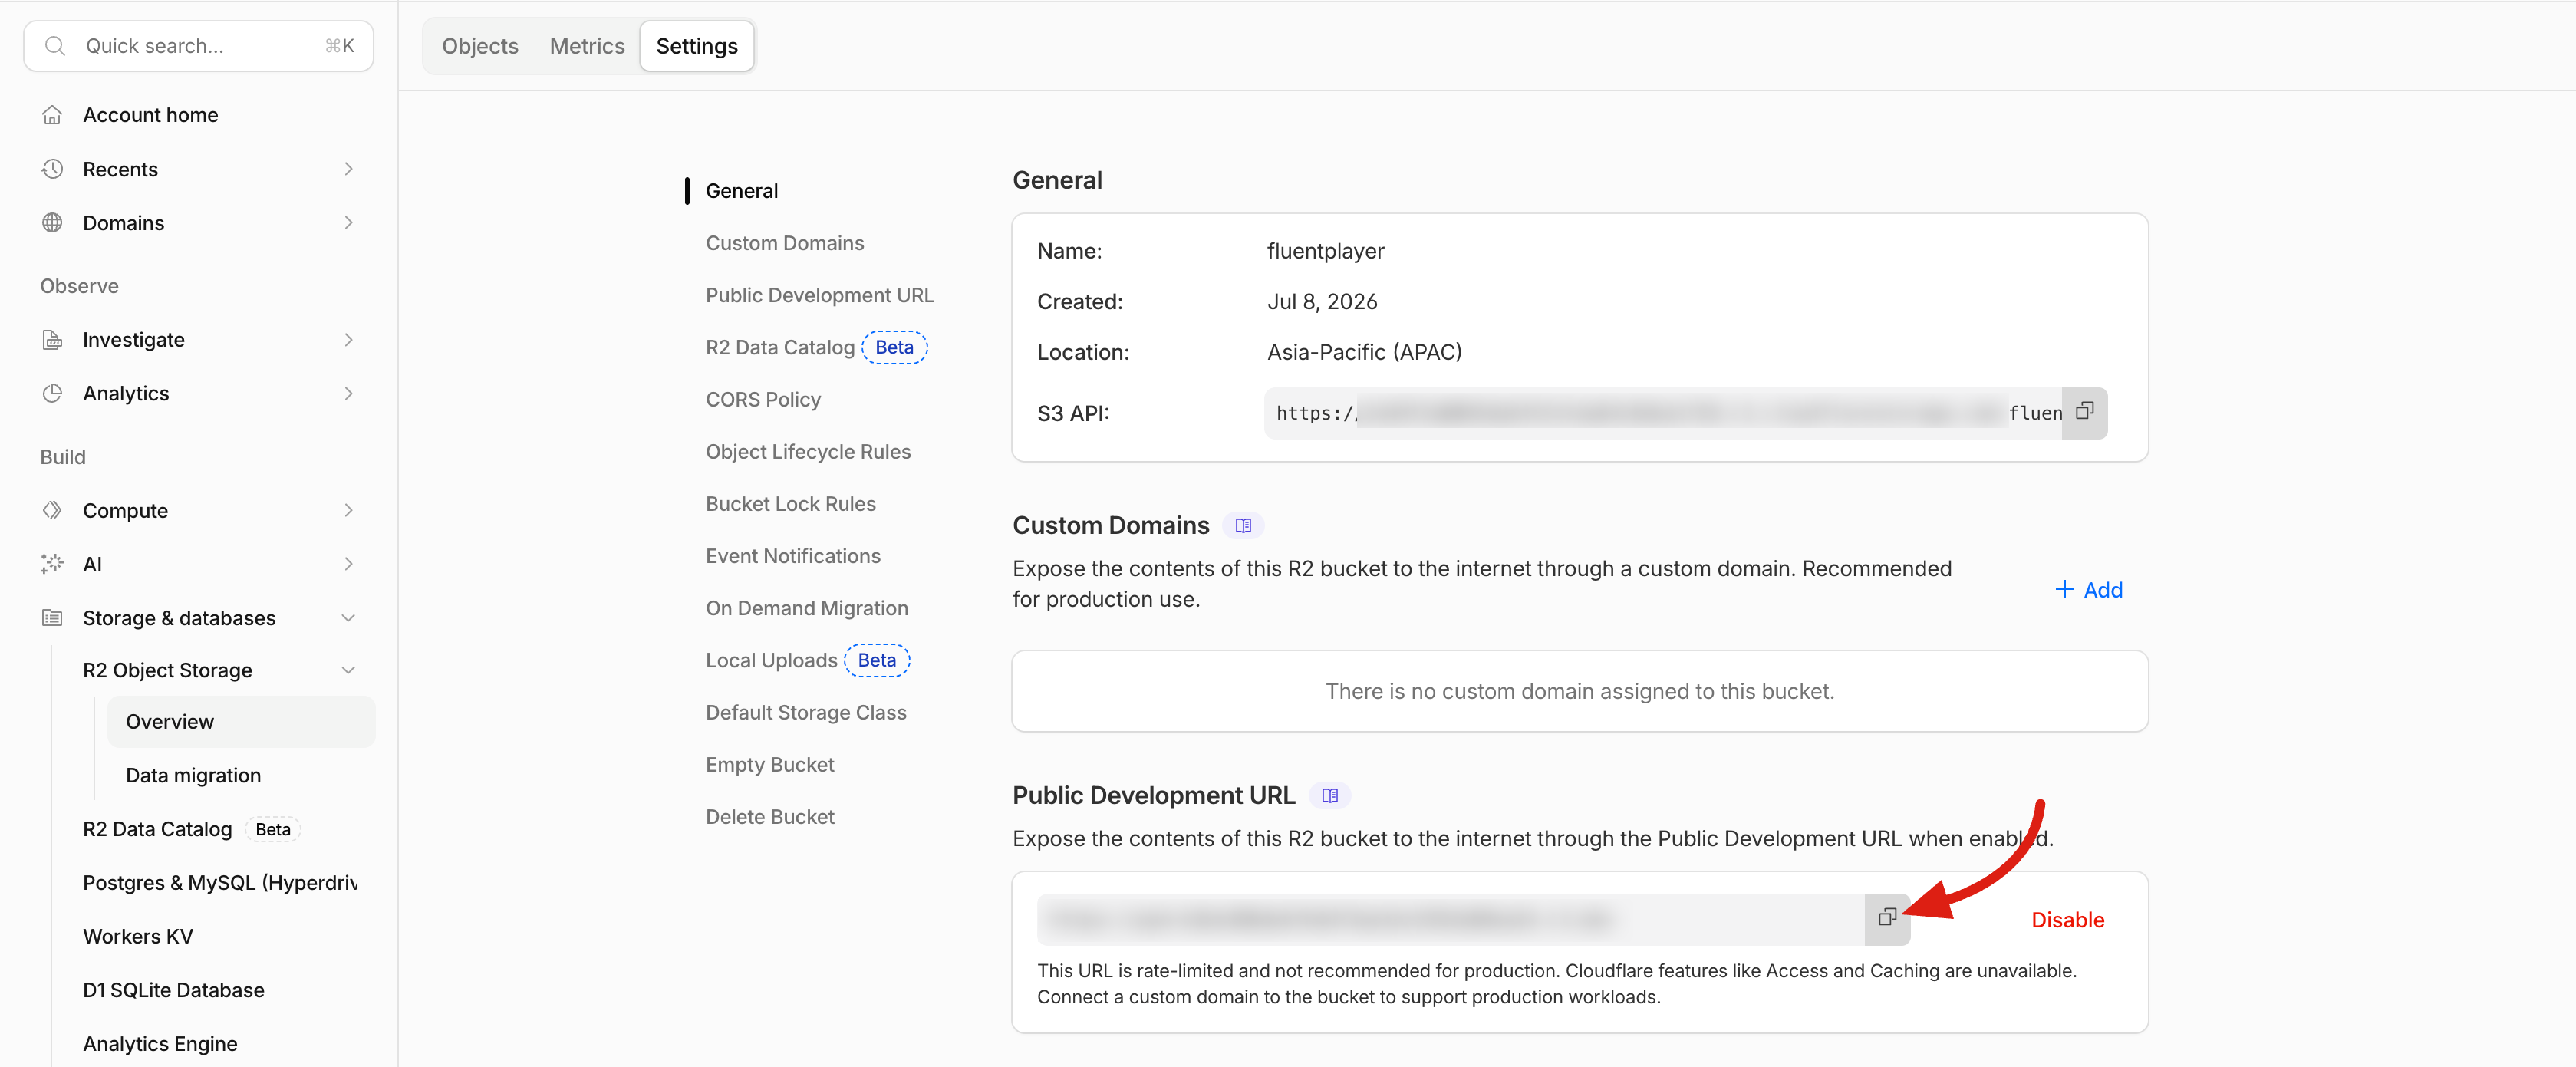
Custom domain for production
The Public Development URL is rate-limited and intended for testing. For a production site, connect a custom domain to the bucket (under the same Settings tab) and use that as your public URL instead.
Step 4: Create an R2 API Token
FluentPlayer needs an API token so it can upload and read files in your bucket. Go back to R2 Object Storage → Overview, and in the Account Details box click {} Manage next to API Tokens.
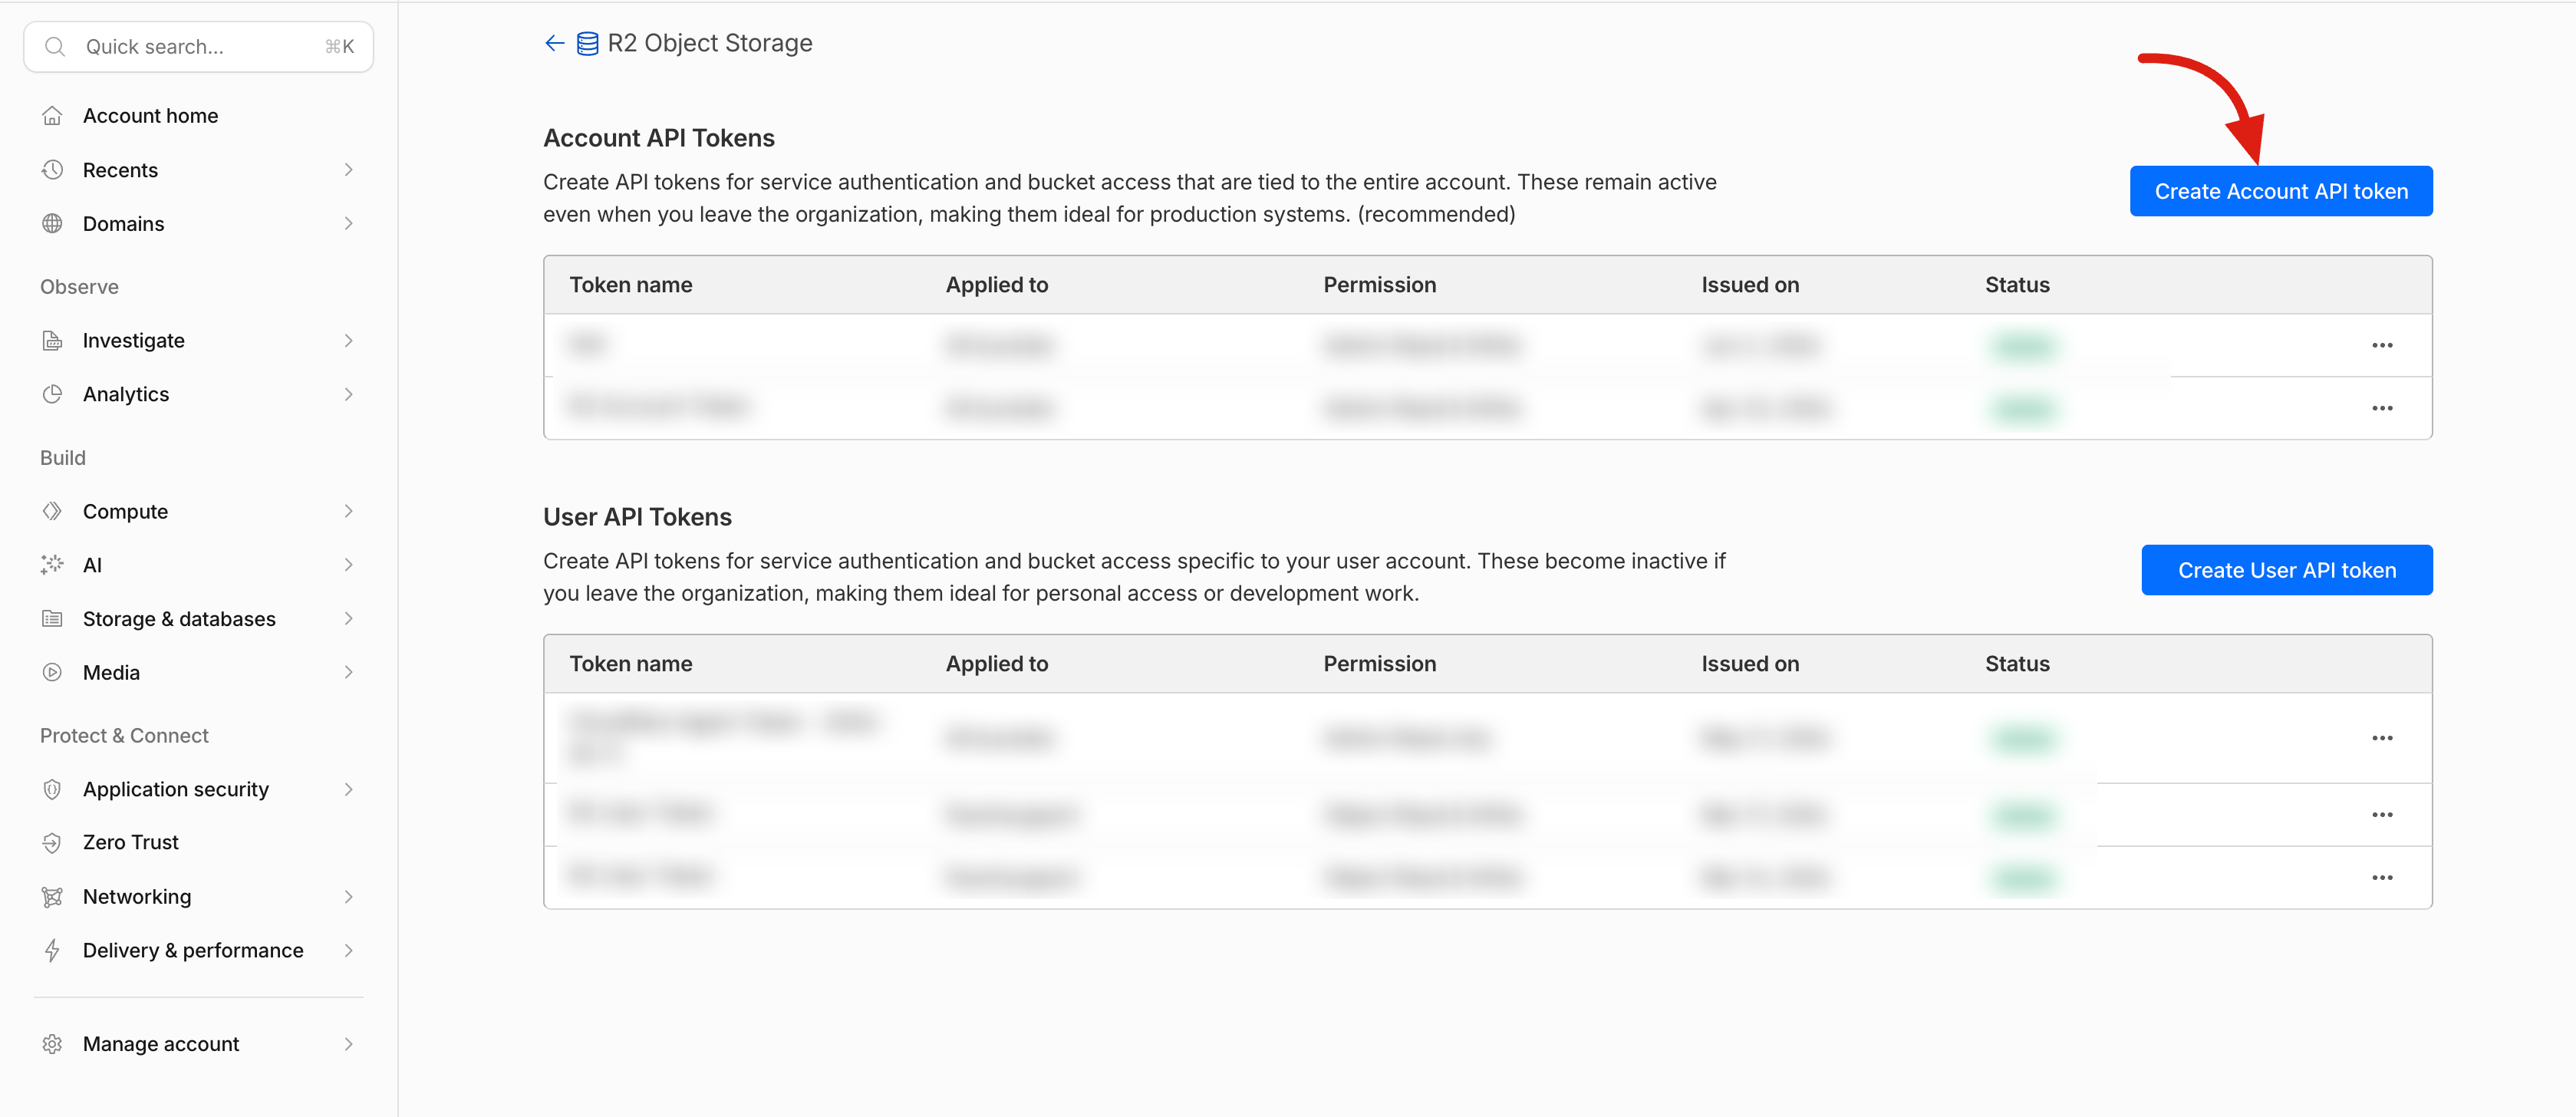
On the API Tokens page, click Create Account API token.
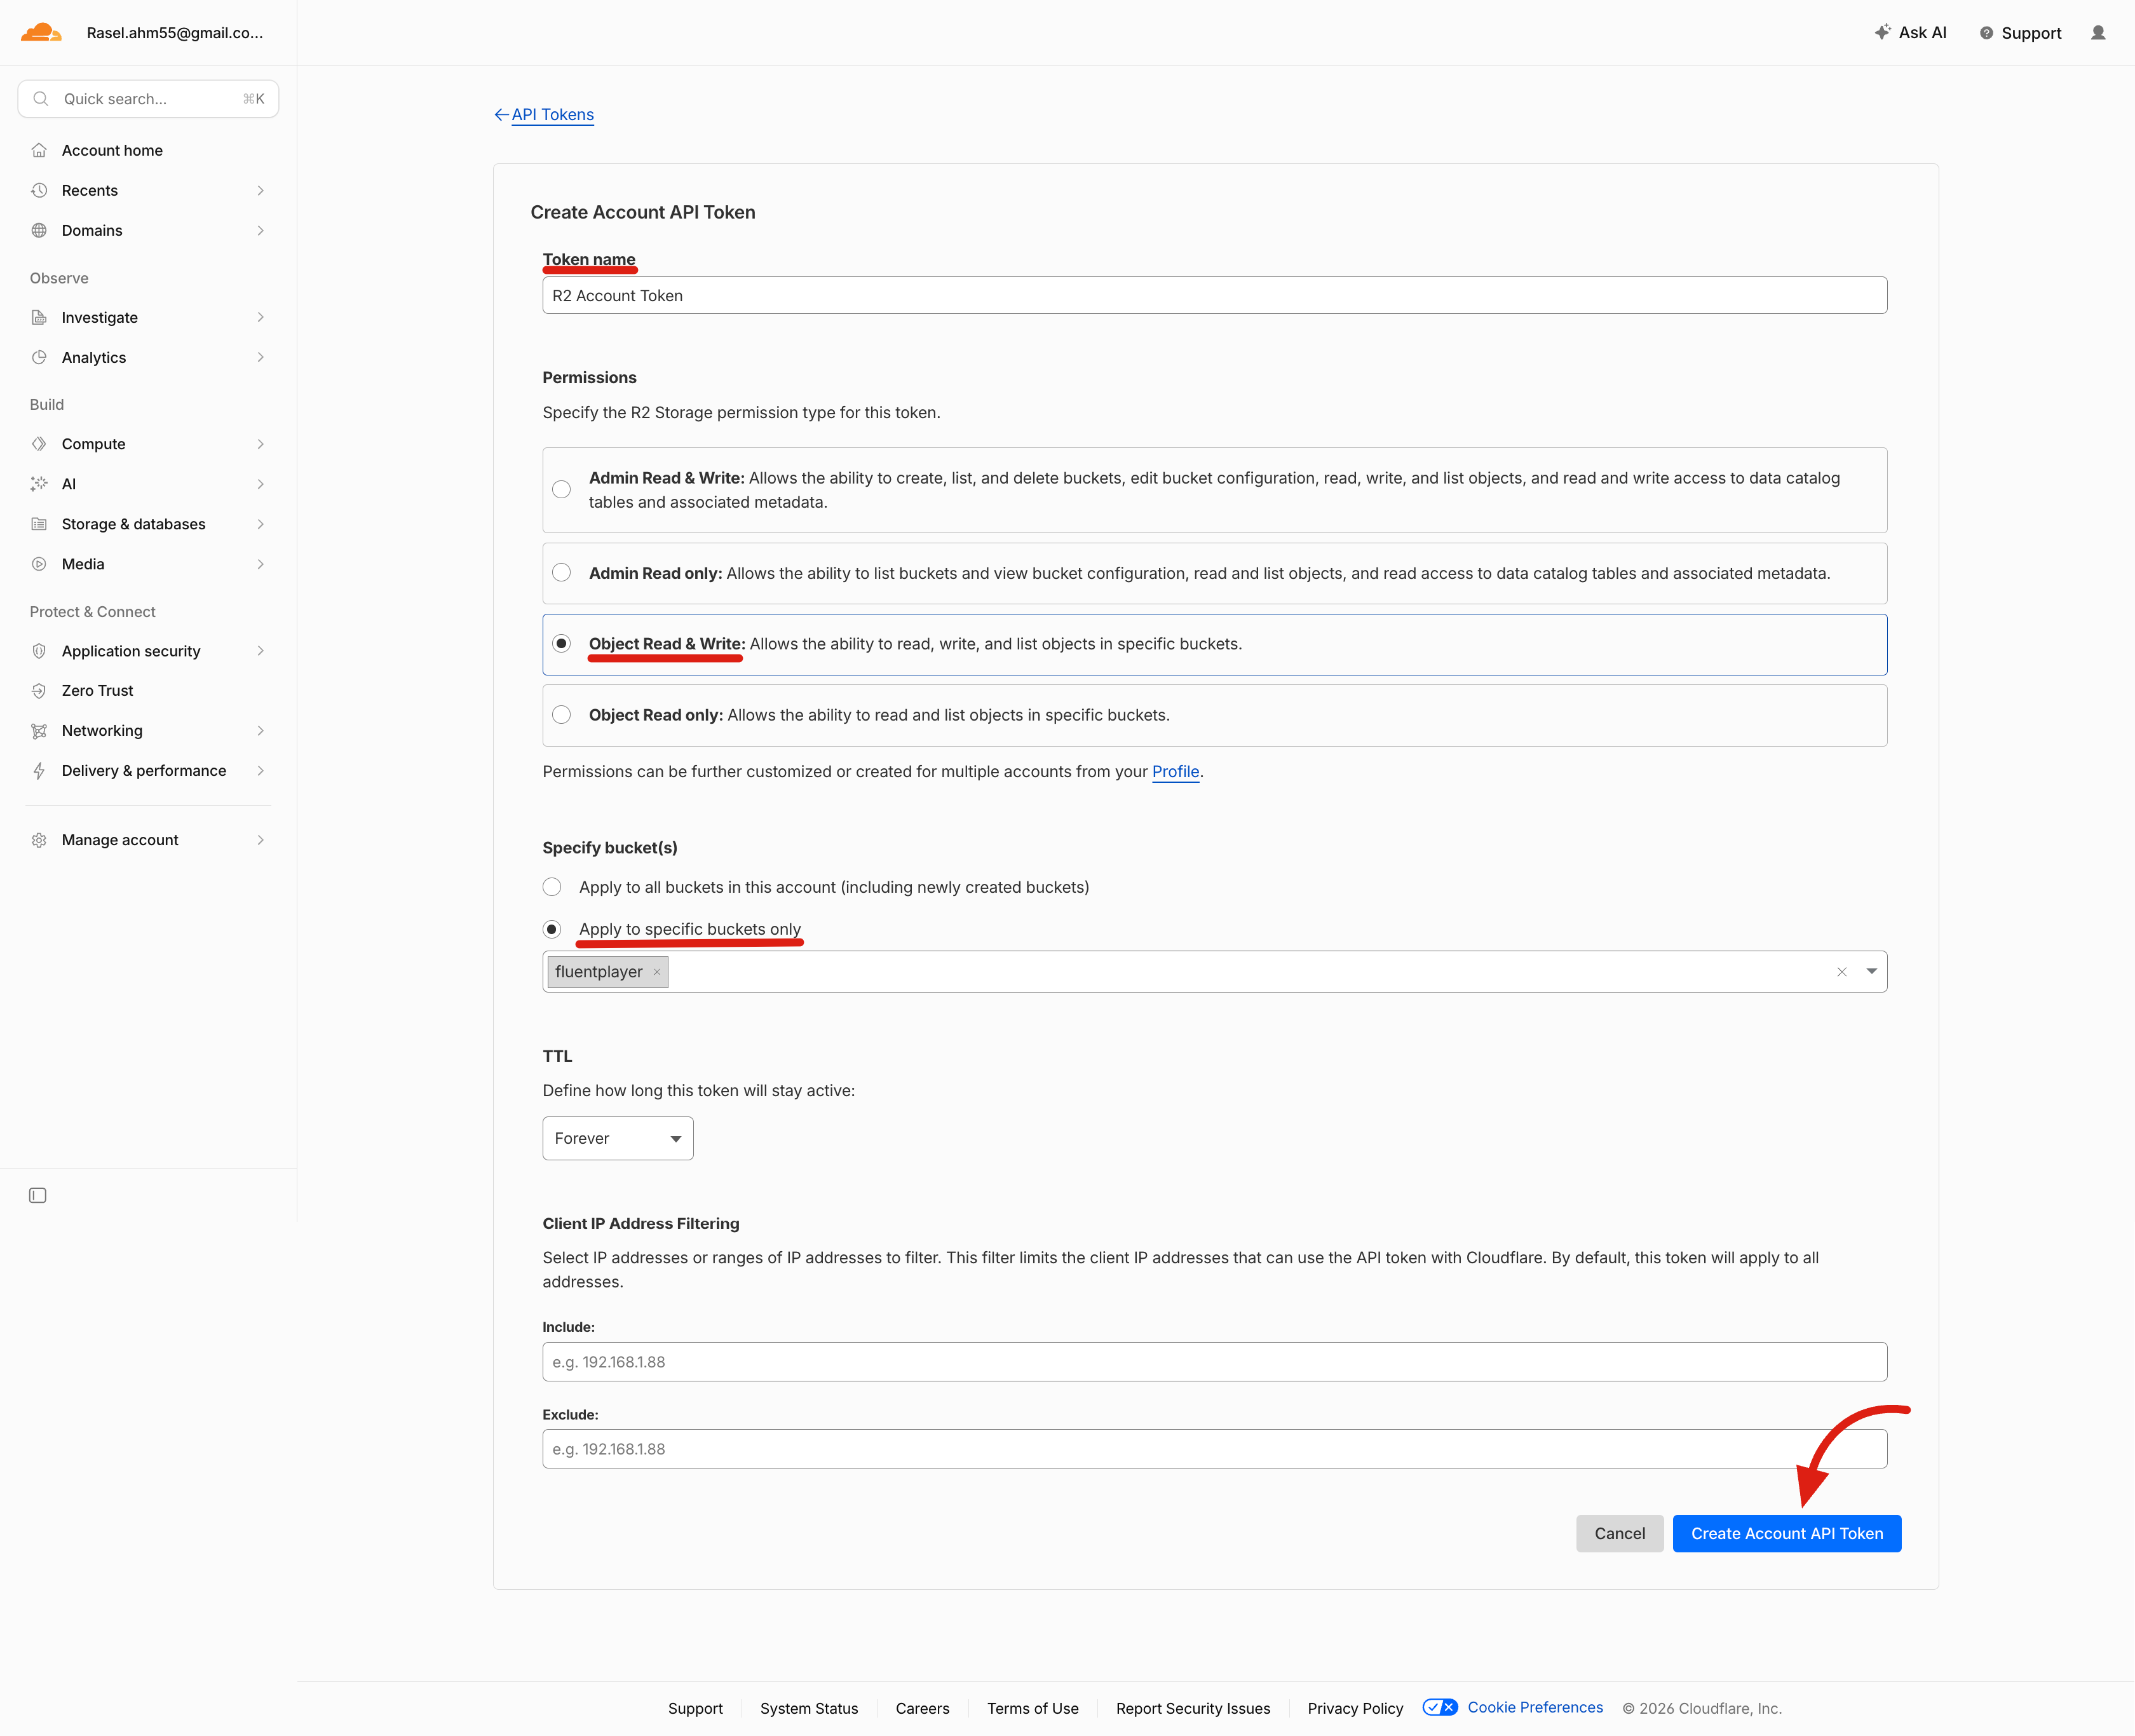
Configure the token:
- Token name — give it a descriptive name, such as
R2 Account Token. - Permissions — select Object Read & Write.
- Specify bucket(s) — choose Apply to specific buckets only and select the bucket you created.
- Leave TTL on Forever so the connection doesn't expire.
- Click Create Account API Token.
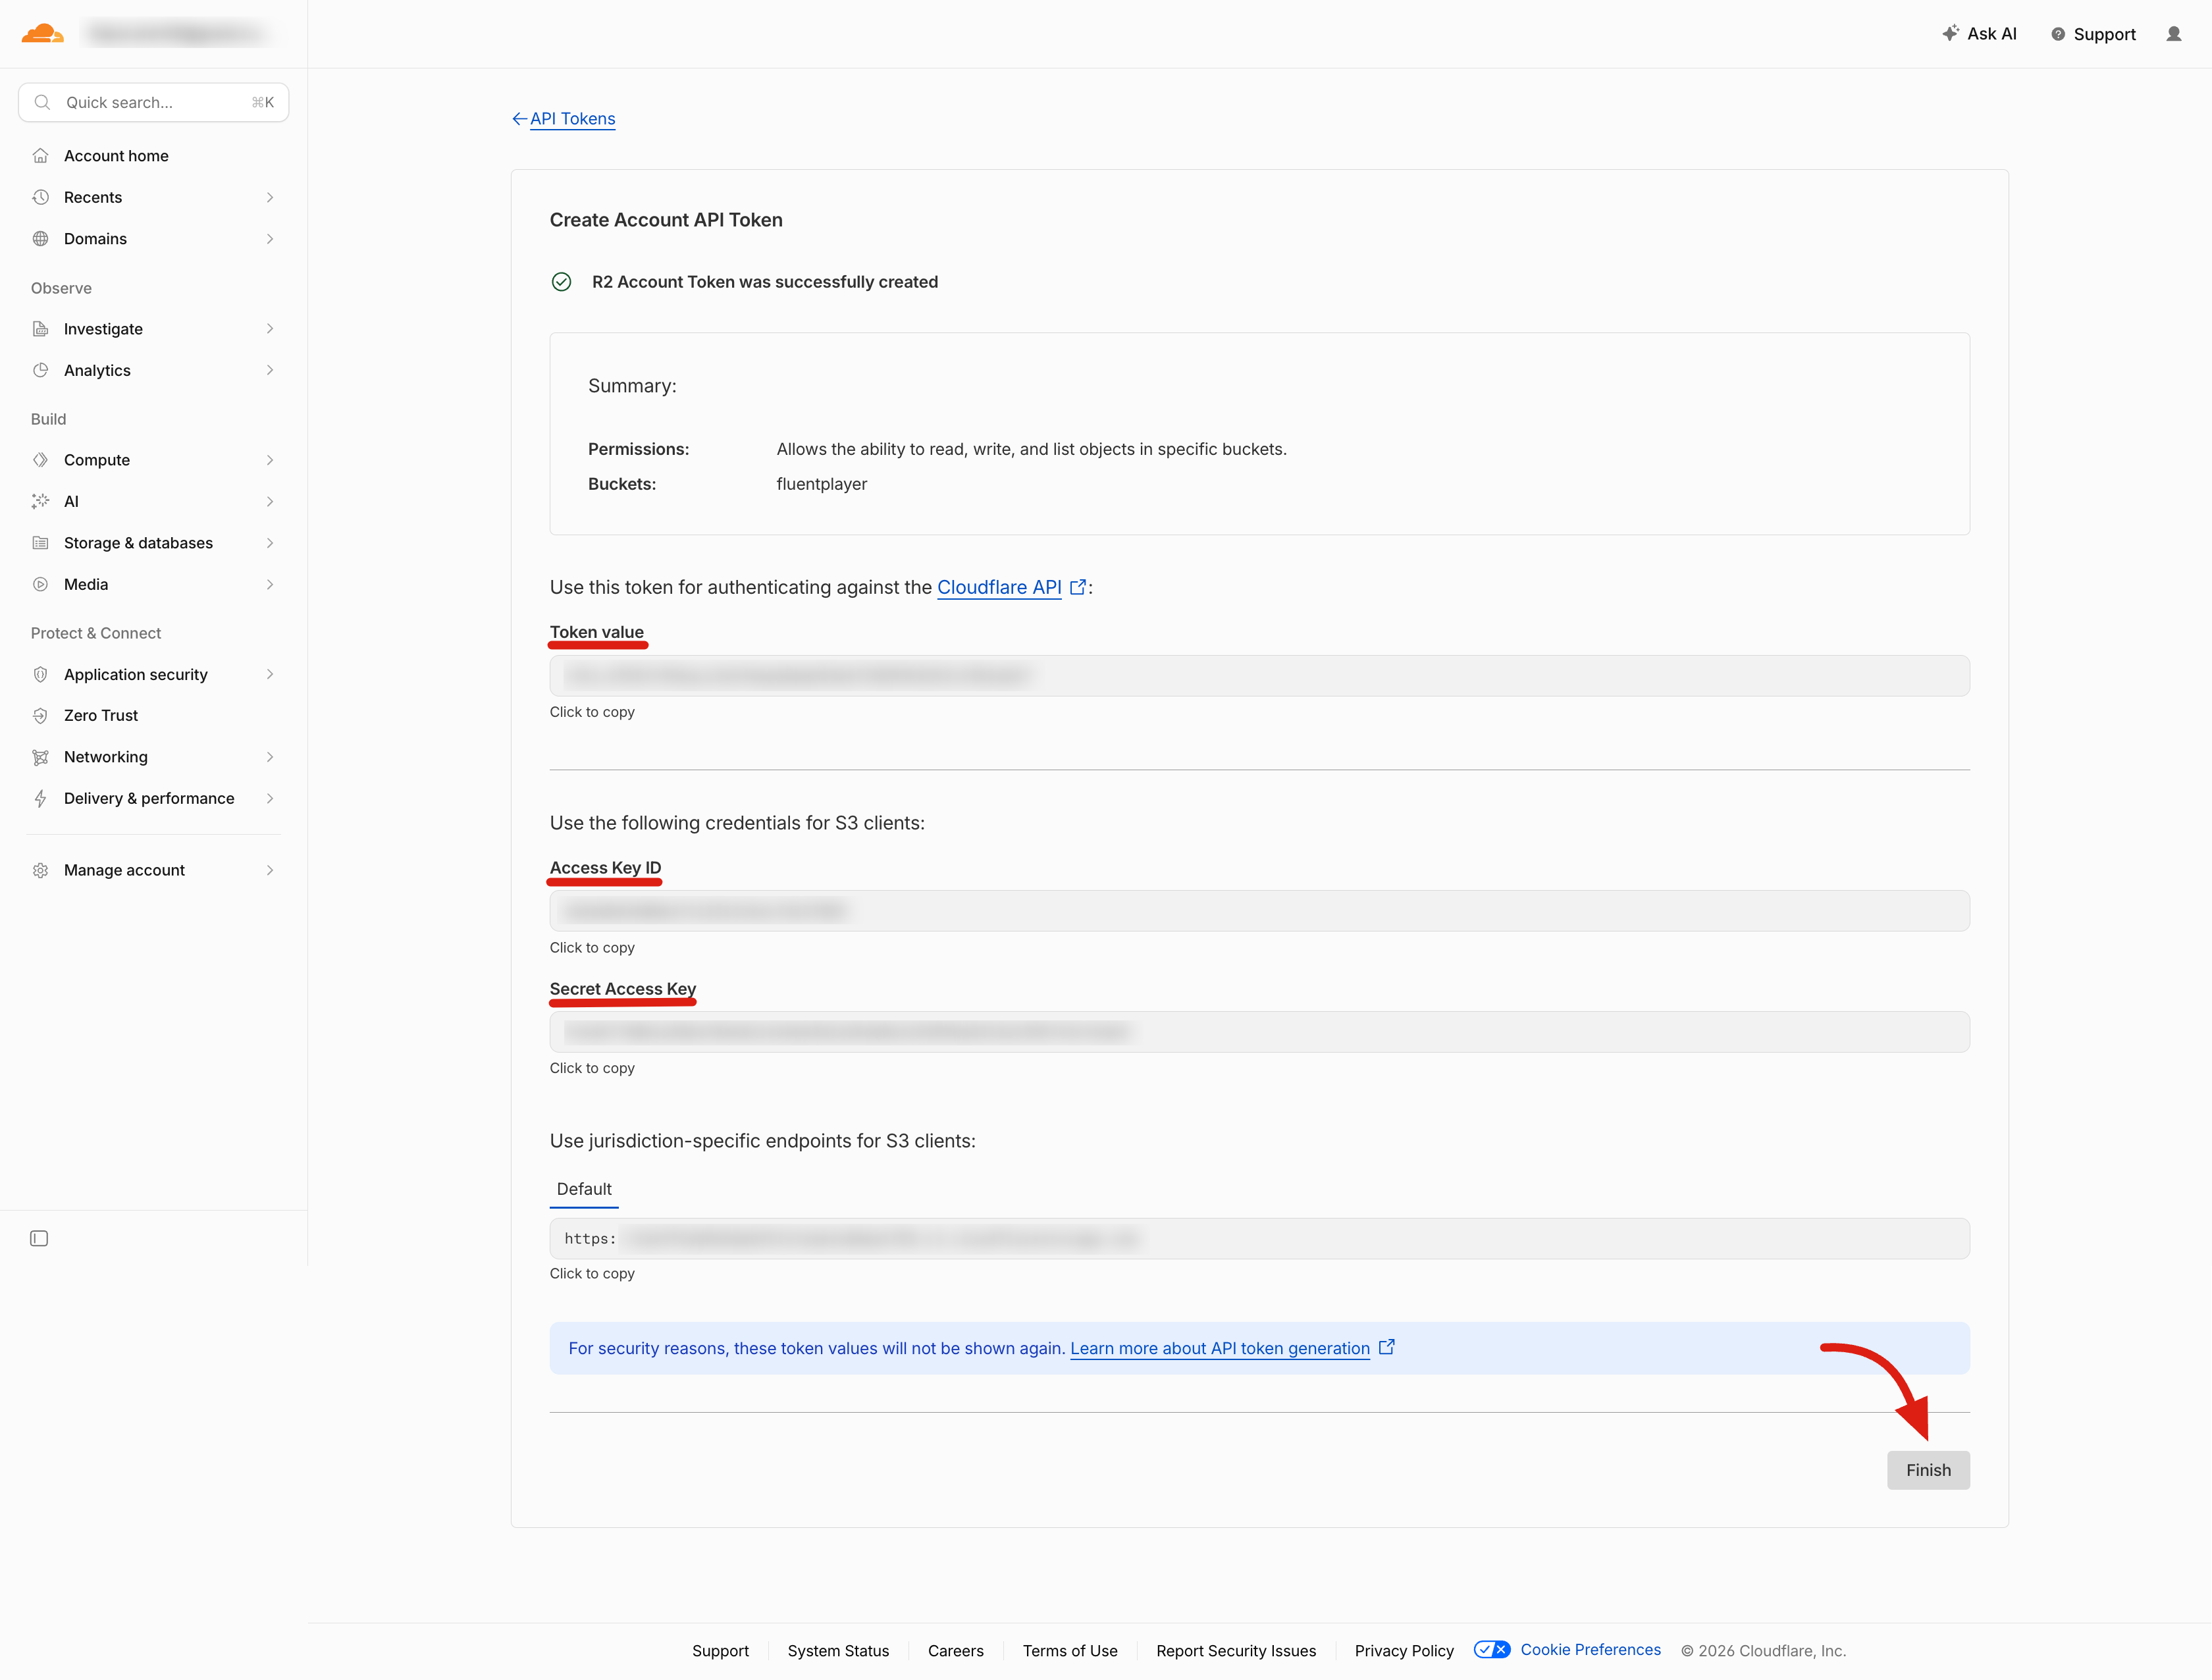
Cloudflare now displays your credentials. Copy the Access Key ID and the Secret Access Key — you'll paste both into FluentPlayer in the next step.
NOTE
The Secret Access Key is shown only once. Copy it before you click Finish — if you lose it, you'll need to create a new token.
Step 5: Connect R2 to FluentPlayer
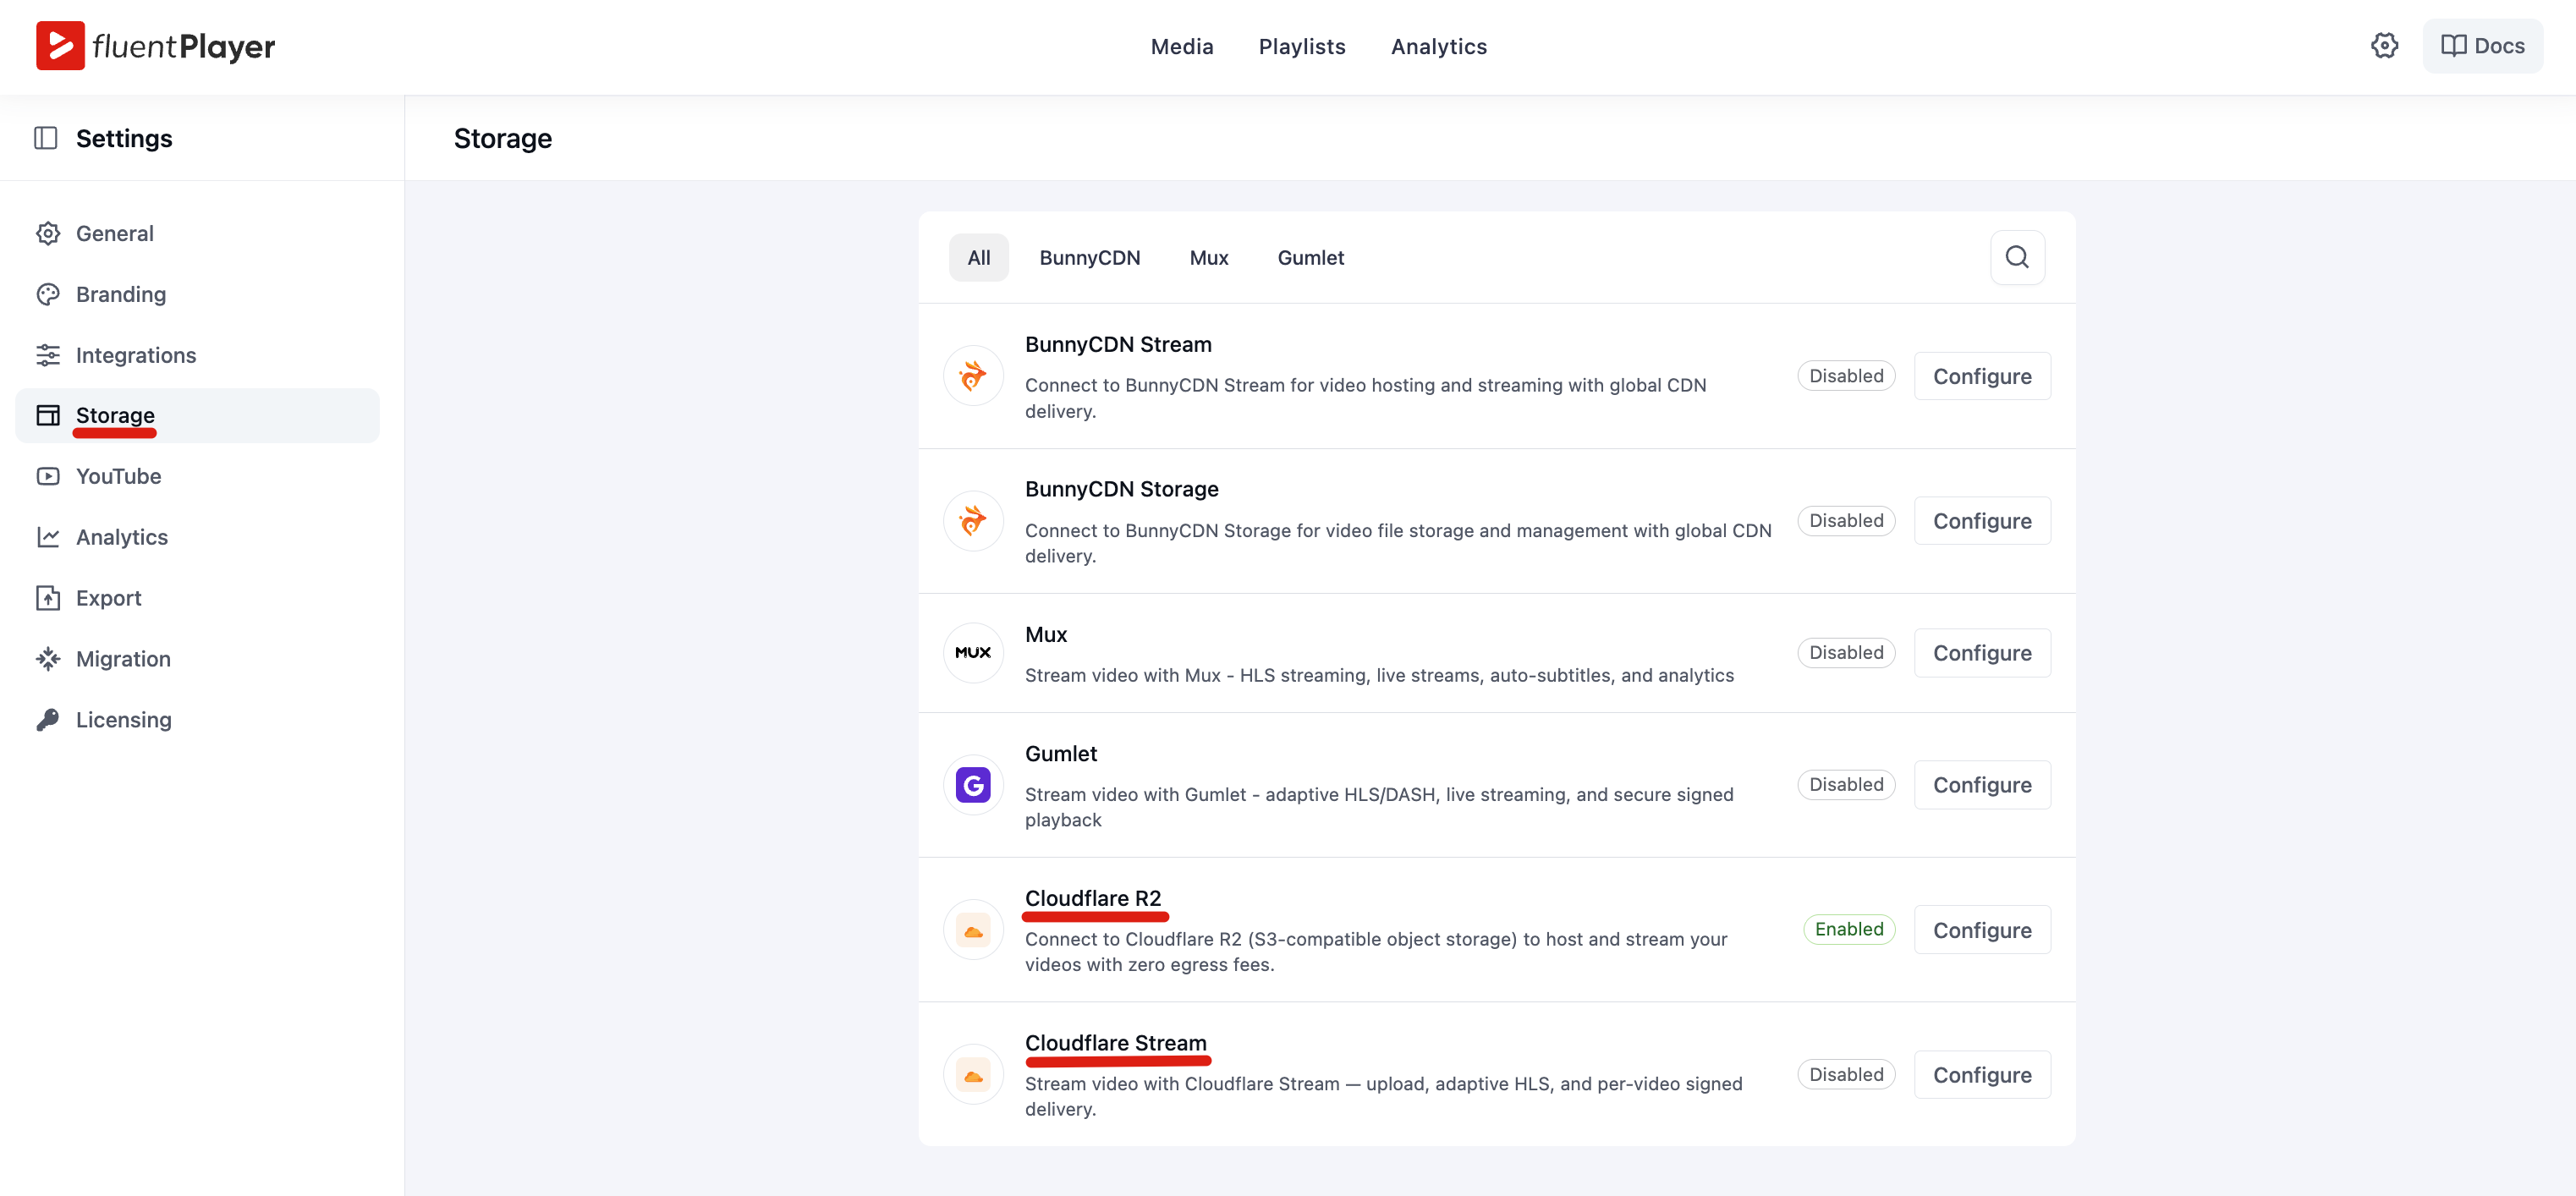
In WordPress, go to FluentPlayer Pro → Settings → Storage, then click Configure on the Cloudflare R2 row.
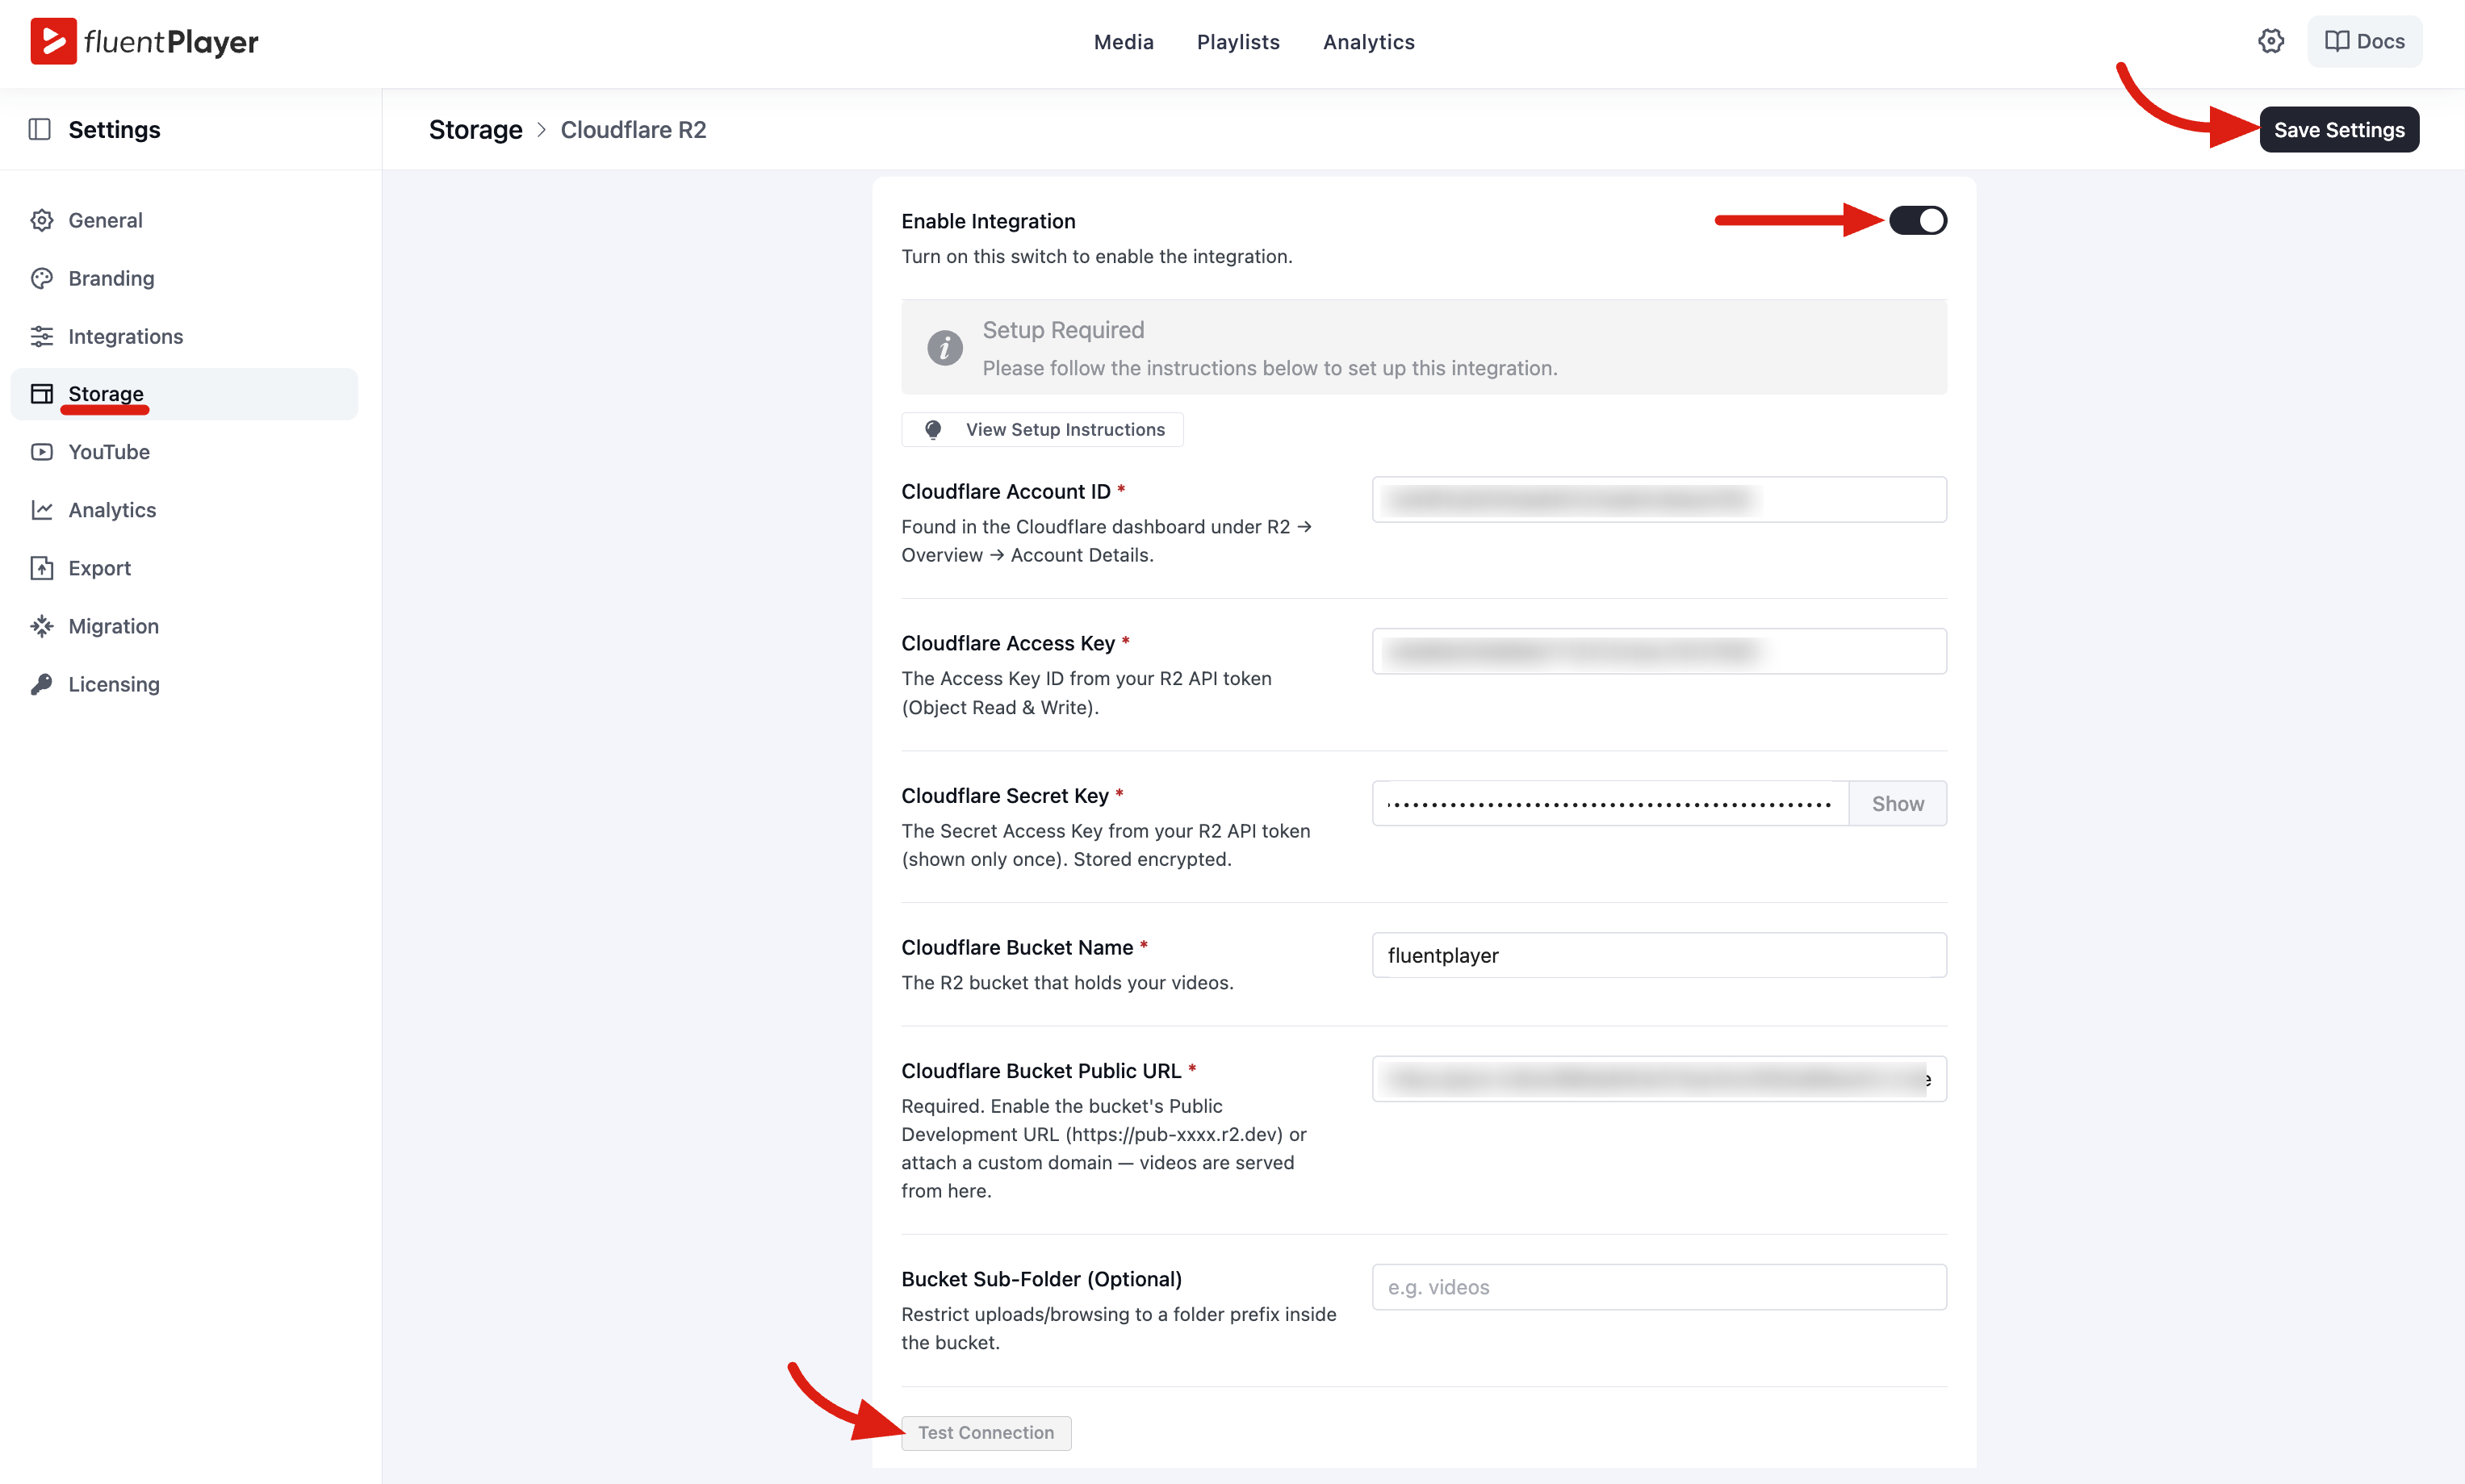
Fill in the form with the details you collected from Cloudflare:
- Toggle Enable Integration to turn it on.
- Cloudflare Account ID — the Account ID from Step 1.
- Cloudflare Access Key — the Access Key ID from your R2 API token.
- Cloudflare Secret Key — the Secret Access Key from your R2 API token (stored encrypted).
- Cloudflare Bucket Name — the name of the bucket you created (for example,
fluentplayer). - Cloudflare Bucket Public URL — the public URL from Step 3.
- Bucket Sub-Folder (Optional) — a folder prefix inside the bucket if you want to keep uploads organized (for example,
videos).
Click Test Connection to confirm the credentials work, then click Save Settings.
Option 2: Cloudflare Stream
What You Need
- A Cloudflare account with Stream enabled.
- A Cloudflare API Token with Stream Read + Edit permissions.
- FluentPlayer Pro active on your site.
Step 1: Get Your Account ID and API Token
You need two values from Cloudflare:
- Account ID — open Stream in your Cloudflare dashboard; the Account ID is shown in the page sidebar.
- API Token — create a token with Stream Read + Edit permissions. This same token is also used to mint playback tokens for your private (signed) videos.
Step 2: Connect Stream to FluentPlayer
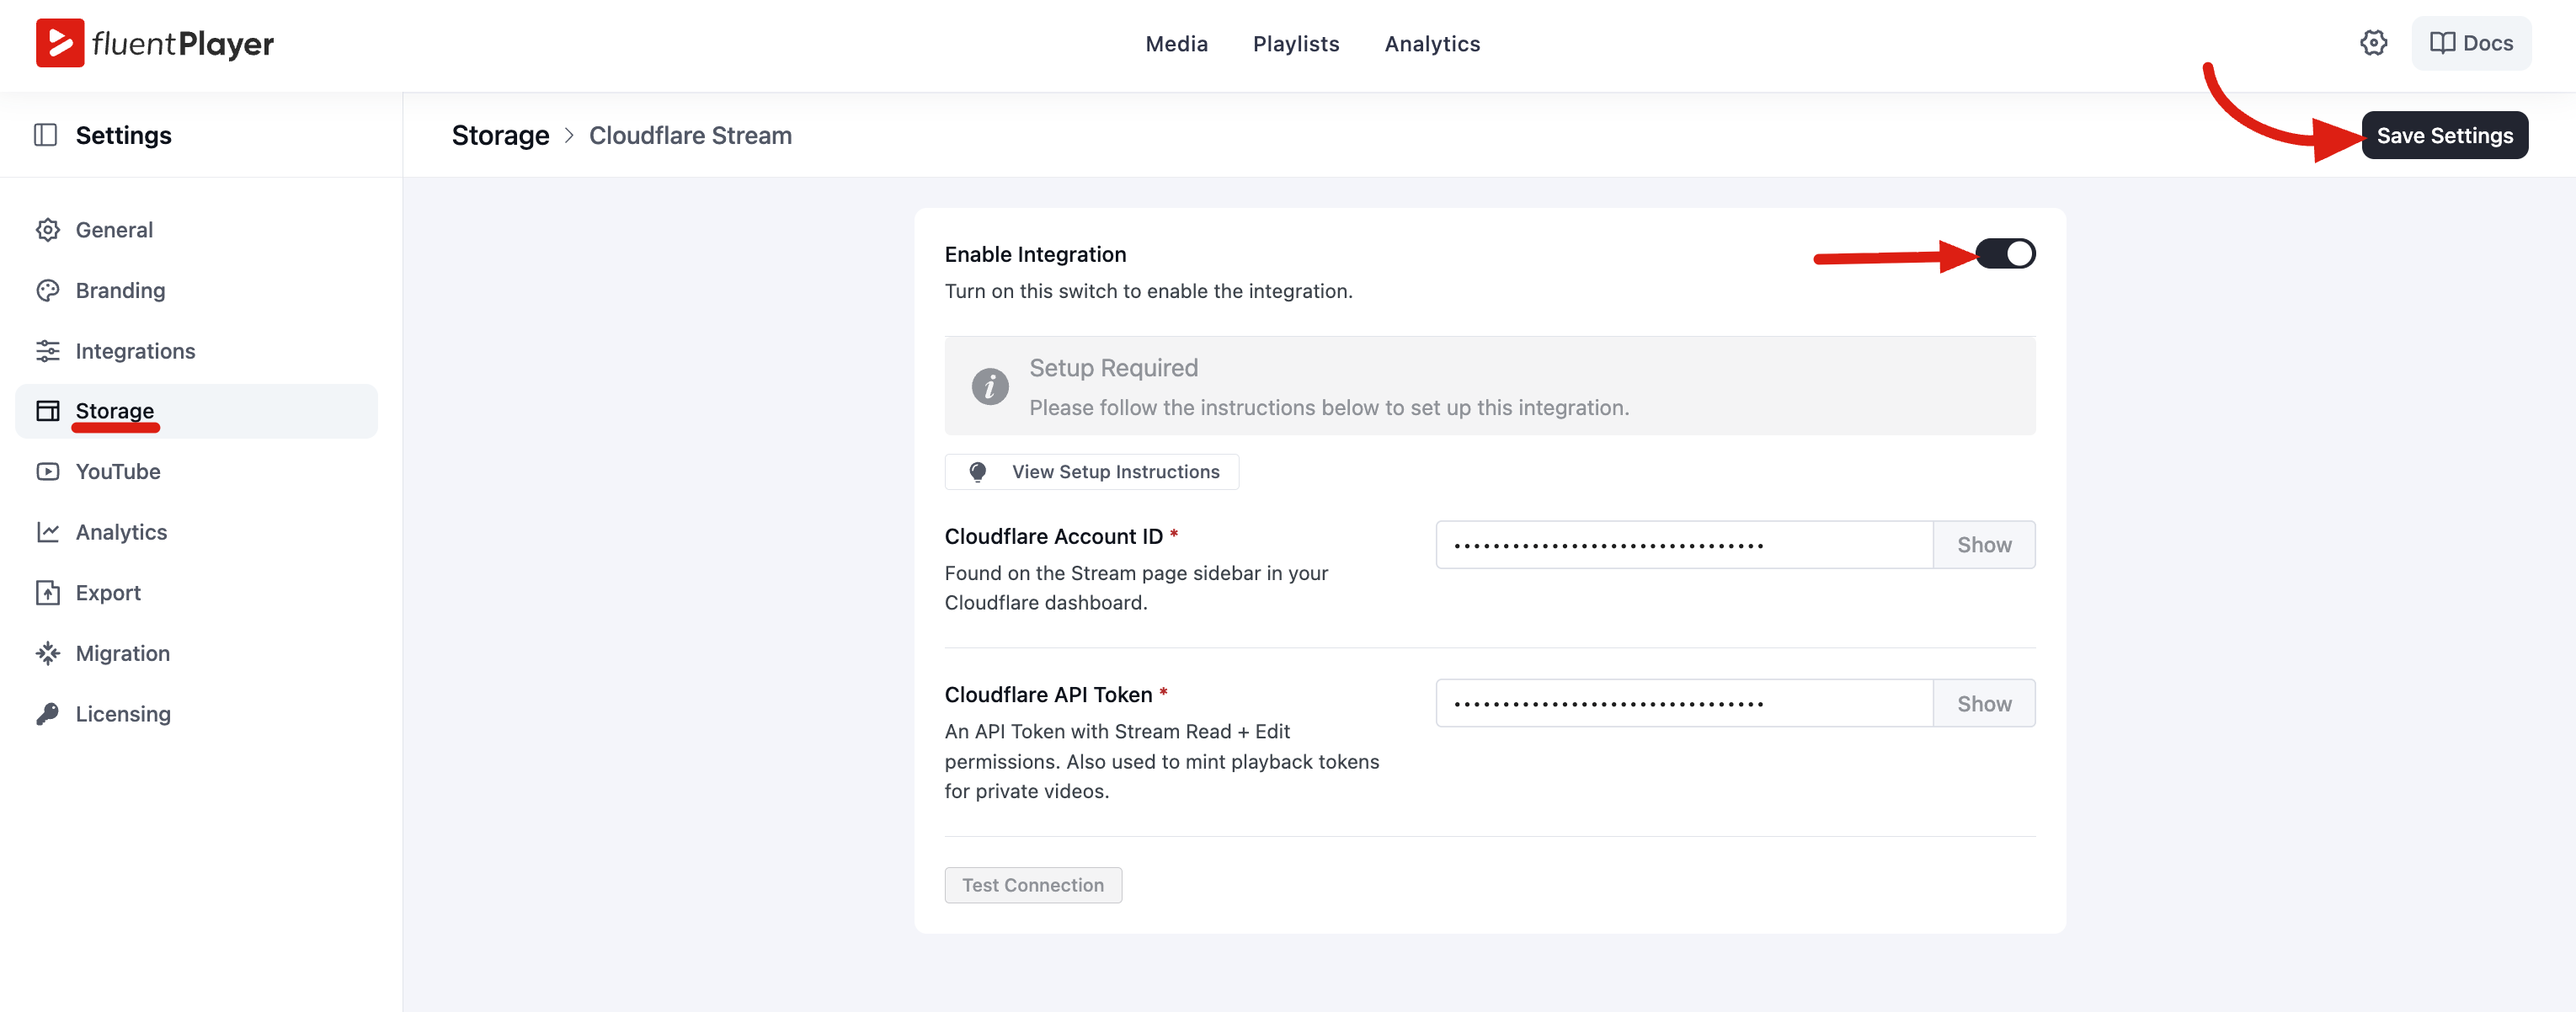
In WordPress, go to FluentPlayer Pro → Settings → Storage and click Configure on the Cloudflare Stream row.
- Toggle Enable Integration to turn it on.
- Cloudflare Account ID — the Account ID from your Stream dashboard.
- Cloudflare API Token — your Stream Read + Edit token.
Click Test Connection to verify, then click Save Settings.
Using Cloudflare as a Video Source
Once the integration is connected and saved, Cloudflare becomes available as a source when you add or edit media:
- Go to FluentPlayer → Media and create or edit a media item.
- In the Source section, choose your connected Cloudflare provider.
- Select or upload the video you want to use.
- Save the media, then embed it like any other FluentPlayer video.
See Video Sources for how Cloudflare fits alongside every other source type.
Troubleshooting
| Problem | Solution |
|---|---|
| Test Connection fails | Double-check the Account ID, Access Key, and Secret Key for stray spaces. For R2, confirm the API token uses Object Read & Write and is applied to the correct bucket. |
| Video won't play (R2) | Make sure the bucket's Public Development URL is enabled (Step 3), and that Cloudflare Bucket Public URL in FluentPlayer matches it exactly. |
| "Access denied" or missing files | Verify the Bucket Name is spelled exactly as in Cloudflare, and that any Bucket Sub-Folder value matches where your files actually live. |
| Stream connection rejected | Confirm your API Token has Stream Read + Edit permissions and belongs to the same account as the Account ID. |
| A long video stops partway through | Playback tokens are issued for a set lifetime. FluentPlayer now matches the token's lifetime to the length of the video, so a two-hour video no longer receives a token that expires before the end. If you still see this, update FluentPlayer and clear any page cache so old tokens aren't served from cache. |
| Pages with private Stream videos load very slowly | This is the signature of a misconfigured Stream connection: FluentPlayer had to retry the provider for every private video on the page. Open Settings → Storage, run Test Connection for Cloudflare Stream, and fix the credentials. Recent versions fail fast instead of stalling the page, but the underlying connection still needs fixing for the videos to play. |